
Finally the totally new Nucleo-F746 is in my hands! This is the first development kit of the Nucleo-144 line from ST, and I've to say that probably, at that street price (~23$), is the best development kit a maker can find on the market, if you consider that a genuine Arduino DUE costs more than 40$ and its MCU is just a Cortex-M3.
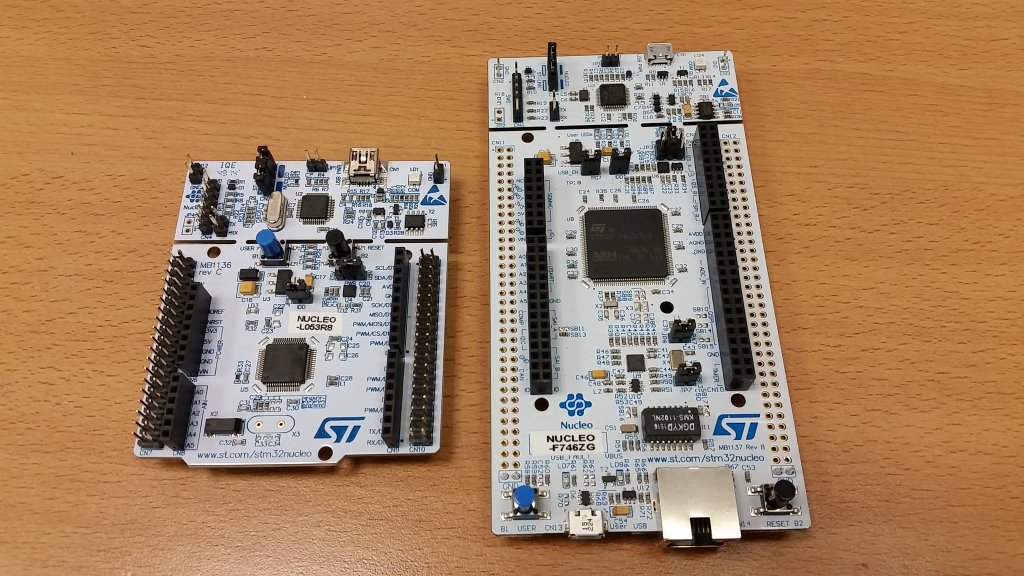
Compared to the classic Nucleo-64, it looks impressive: it's more wider and offers a lot of more "standard" peripherals. The USER LEDs are now three (red, blue and green), and the power LED is now green. The most relevant thing is that the board comes with a LAN jack, magnetics and a SMSC phyther. This means that we can start developing IoT applications using the powerful Cortex-M7 core running at 216MHz. Respect to the STM32F746-Discovery, which was the first "cheap" F7 development board from ST, it doesn't provide an LCD display. However, the Nucleo-144 provides the most of MCU signal I/Os through the "Zio" connectors, while the Discovery-F7 only few signals routed to the Arduino-style connectors. If you are going to use the Nucleo-144 to develop a custom product, then it's the best option.
In this post I will show you the steps needed to start working with this fantastic piece of hardware. We'll use the LwIP stack to create a simple web server running on the Nucleo. The web-app will allow us to interact with Nucleo LEDs and USER BUTTON, using bootstrap and jQuery. The following video shows how the HTTP server works.
I'll assume that you have a working Eclipse/GCC ARM tool-chain based on the excellent GNU ARM Eclipse plug-ins by Liviu Ionescu. If you don't have the whole tool-chain installed, please refer to the free sample of my book about STM32 platform: you'll find all the required instructions to getting started with those tools. It's completely useless repeat here more that 40 pages of instructions.
[box type="warning" align="" class="" width=""]Read carefully
My book currently relies on OpenOCD 0.9. However, this release doesn't support the STM32F7, so you'll need a preview of the release 0.10. Liviu provides a precompiled release for Windows, Linux and MacOS. You can download it from here.[/box]
STEP1: Create a new Eclipse project
The first step is creating a new Eclipse project. Liviu Ionescu has recently updated the project templates, adding the support to STM32F7 MCUs. However, we use another procedure here: we'll first create a basic ARM C/C++ project, and then we'll import inside it a project generated by CubeMX, which simplify a lot the MCU configuration procedure. Moreover, it will allow us to quickly import the LwIP stack, which is used to develop TCP/IP applications with STM32 MCUs.
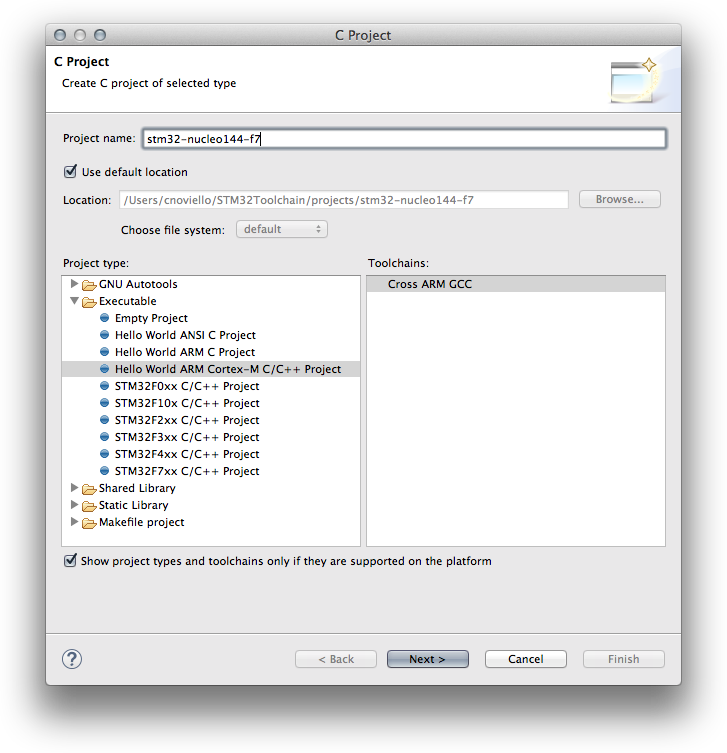
So, go to File->New->C Project and select the entry Hello World ARM Cortex-M C/C++ Project. Give the name you like to the project. Click on Next.
In the next step select Cortex-M7 from the Processor core entry, insert 1024 inside the Flash size field and 320 in the RAM size field, as shown below.
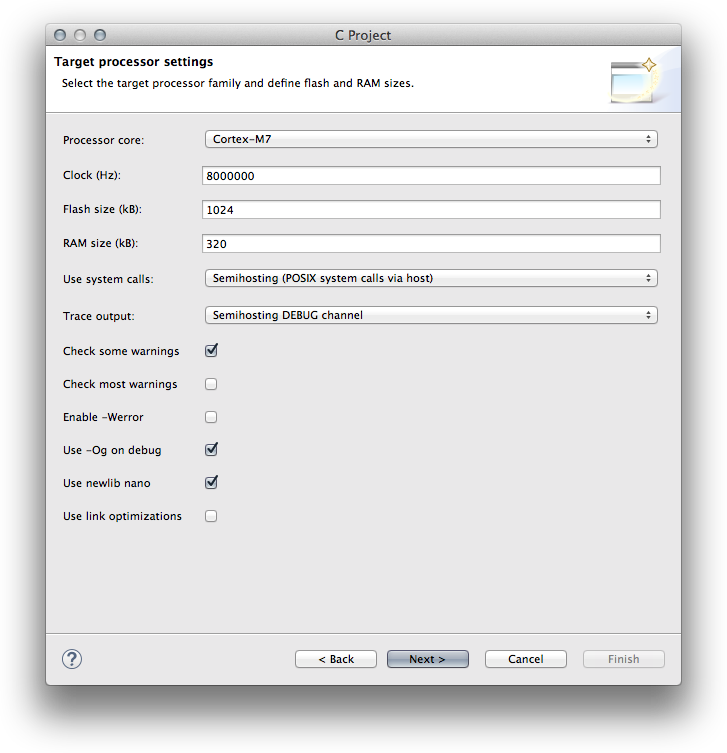
[box type="info" align="" class="" width=""]Where are those numbers coming from?
Those numbers are nothing more than the size of FLASH and SRAM memories in a STM32F746 MCU. They are used to generate the right linker script, as we'll see next. [/box]
Click on Next. In the next step leave all unchanged except for the Vendor CMSIS field: write stm32f7xx inside it, as shown below.
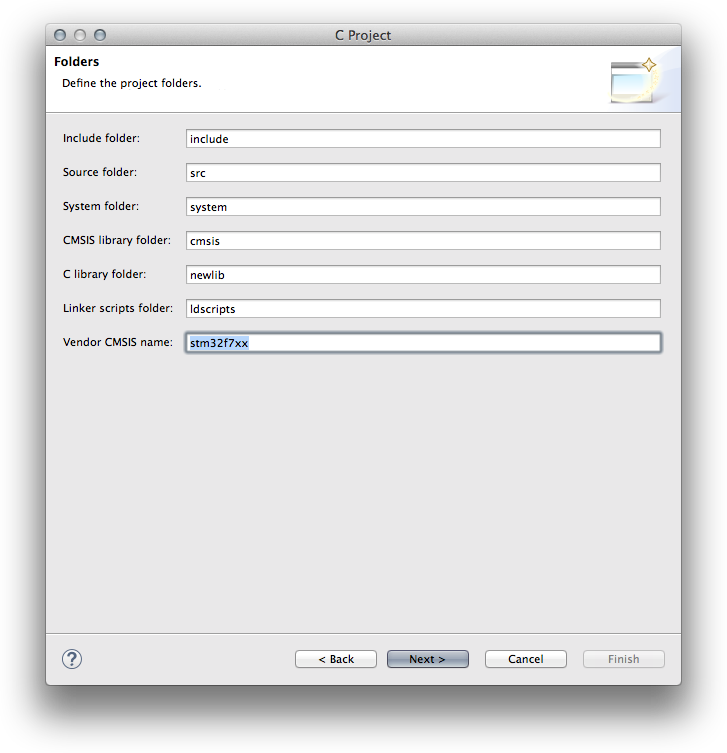
Complete the project wizard leaving all standard options.
Now, before we import a CubeMX project inside this Eclipse project, it's better to modify the ldscripts/mem.ld file. By default, the GNU ARM plug-in assigns 0x00000000 as starting address for the FLASH memory, while in all STM32 MCUs the internal FLASH is mapped at 0x08000000. So, from the Eclipse IDE open the file ldscripts/mem.ld and write the first line of the MEMORY section as shown below:
...
MEMORY
{
FLASH (rx) : ORIGIN = 0x08000000, LENGTH = 1024K
RAM (xrw) : ORIGIN = 0x20000000, LENGTH = 320K
...
Ok. The next important step is to CLOSE the Eclipse project, before we import the CubeMX.
[box type="warning" align="" class="" width=""]Do not skip this step! Close the Eclipse project before continuing the tutorial!!!!![/box]
STEP2: Create a new CubeMX project
Now we need to create a new project in CubeMX. First of all, ensure that you have the latest version of CubeMX, which at time of writing this tutorial is the 4.12. This is the first version that supports the Nucelo-144 line-up, so it's important to have at least this release.
Launch CubeMX and start a new project. In the New Project wizard select the Board Selector tab, and choose the Nucleo-F746ZG from the list. Be sure that the flag "Initialize all IP with their default mode" is checked. Click on OK and wait for project generation.
[box type="warning" align="" class="" width=""]Read carefully
At the time of writing this post, January 22th, 2016, a bug affects CubeMX 4.12. This bug is related to the project configuration for this Nucleo, and I've already submitted it to ST. CubeMX simply assigns a wrong address to the Ethernet Phyther. To fix this, go inside the Configuration section in CubeMX and click on the Eth button. In the PHY Address config, change the value from 1 to 0, as shown below.
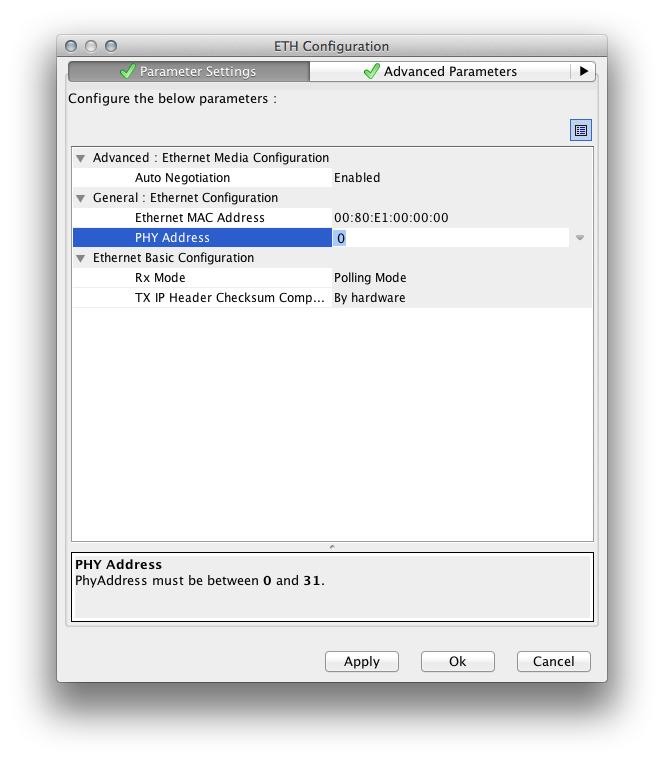
Probably, when you read this post it will be fixed, but it's best to take a look.[/box]
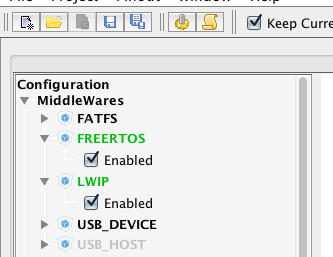
Ok. Now we need to enable two middleware stacks: FreeRTOS and LwIP. From the IP Tree pane (the tree view on the left in CubeMX), enable FREERTOS and LWIP modules, as shown below.
Now go inside the Configuration section in CubeMX and click on the LWIP button. In the DHCP section disable the DHCP module, and assign a static IP address as shown below:

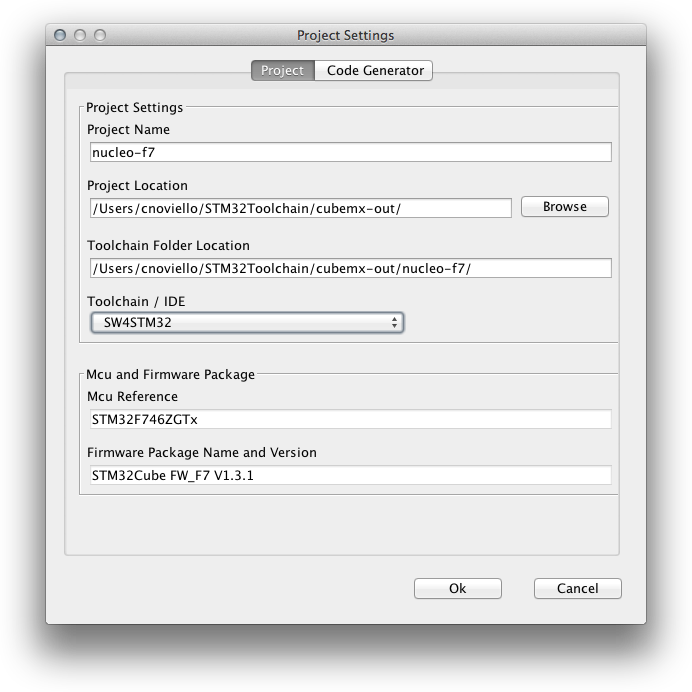
The IP address must match your network configuration. Click on the OK button. Ok. Now we are ready to generate the project code. Go in the Project->Generate Code menu. Choose the Project Name you like (I chose nucleo-f7), but ensure that the Toolchain/IDE selected is the SW4STM32, as shown below.
Click on the OK button.
STEP3: Import the CubeMX project in Eclipse
Now we have to import the project generated with CubeMX inside the Eclipse project made so far. To do this, we'll use a tool I've made. It's named CubeMXImporter, and it's available on my github account. The tool relies on Python 2.7 (NOT 3.x) and the lxml library. Here you can find all the installation instructions. Once CubeMXImporter is installed, open a terminal command line, and write the following command:
|
1 |
$ python cubemximporter.py <path-to-eclipse-project-folder> <path-to-cubemx-project> |
For example, if you named the Eclipse project as stm32-nucleo144-f7 and the CubeMX as nucleo-f7, than the command must be invoked in the following way:
|
1 |
$ python cubemximporter.py <path-to-eclipse-workspace>/stm32-nucleo144-f7 <path-to-cubemx-output-directory>/nucleo-f7 |
CubeMXImporter will automatically import the project skeleton, the CubeF7 HAL and middleware libraries (LwIP and FreeRTOS) inside the Eclipse project.
Ok, now we can reopen the project in Eclipse. Once opened, click with the right mouse button on the project name in the Project Explorer view and select the Refresh entry.
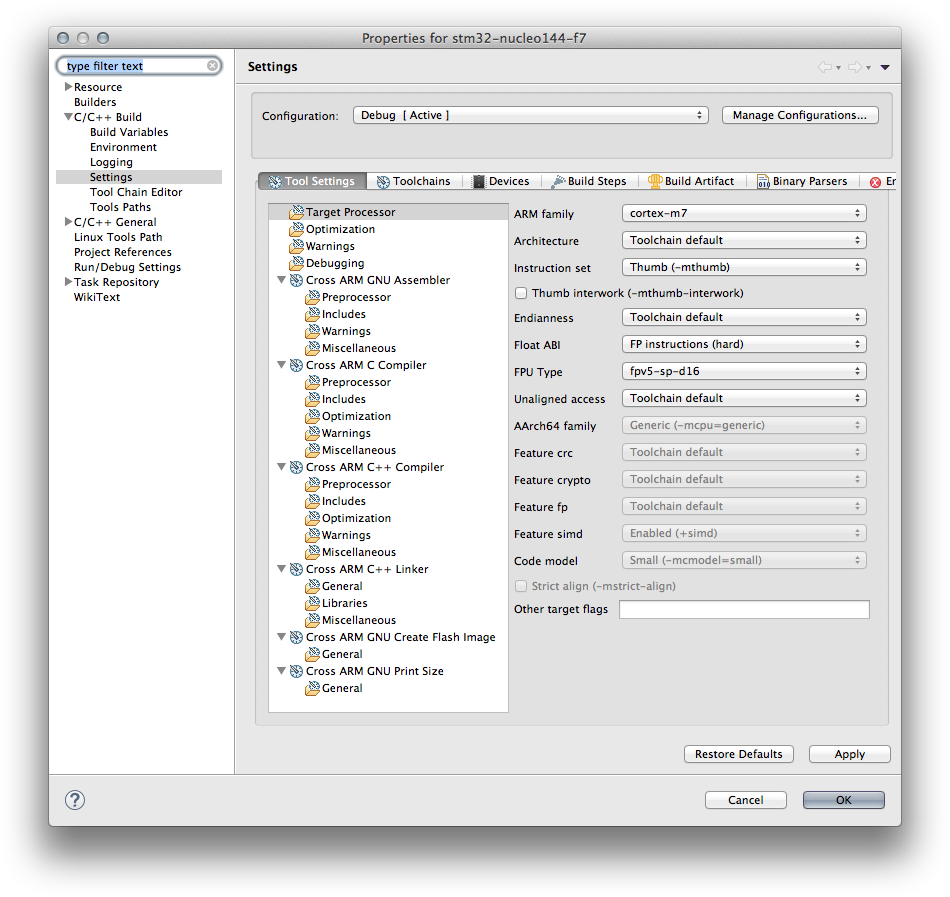
As suggested by the CubeMXImporter tool, we now need to do a couple of things manually. First of all, we need to specify the right FPU configuration for the Cortex-M7. So go inside the Project Settings->C/C++ Build->Settings->Target Processor. In the Float ABI field select "FP instructions (hard)" and in the FPU Type field select "fpv5-sp-d16", as shown below.
Click on the OK. Now we have to select the right FreeRTOS algorithm. In the Project Explorer view, go inside the Middlewares/Third_Party/FreeRTOS/Source/portable/MemMang folder. Select the files heap_1.c, heap_2.c, heap_3.c and heap_5.c. Click with the right mouse button on them and select the entry Resource Configurations->Exclude from build.... Select all the project configurations and click on OK. Now we can compile the application and flash our Nucleo using OpenOCD (if you don't know how to use OpenOCD with the F7 platform, refer to this other post).
If all went the right way, you should be able to ping your Nucleo board.
STEP4: Building a simple HTTP Server
Now we are ready to build a simple HTTP Server using the LwIP stack. The first important thing we have to do is to fix the body of the SysTick_Handler() inside the stm32f7_xx_it.c. A known CubeMX bug causes that the call to HAL_IncTick() function is omitted. So, we need to modify it in the following way:
|
1 2 3 4 |
void SysTick_Handler(void) { HAL_IncTick(); osSystickHandler(); } |
The main() code is quite simple: we first initialize the hardware, and then we create a new thread using the function StartDefaultTask().
|
75 76 77 78 79 80 81 82 83 84 85 86 87 88 89 90 91 92 93 94 95 96 97 98 |
int main(void) { /* Reset of all peripherals, Initializes the Flash interface and the Systick. */ HAL_Init(); /* Configure the system clock */ SystemClock_Config(); /* Initialize all configured peripherals */ MX_ADC1_Init(); MX_GPIO_Init(); MX_USART3_UART_Init(); MX_USB_OTG_FS_PCD_Init(); /* Create the thread(s) */ /* definition and creation of defaultTask */ osThreadDef(defaultTask, StartDefaultTask, osPriorityNormal, 0, 128); defaultTaskHandle = osThreadCreate(osThread(defaultTask), NULL); /* Start scheduler */ osKernelStart(); /* We should never get here as control is now taken by the scheduler */ while (1); } |
The function StartDefaultTask() dose nothing more than initializing the LwIP stack and starting the HTTP server.
|
266 267 268 269 270 271 272 273 274 275 |
void StartDefaultTask(void const * argument) { /* init code for LWIP */ MX_LWIP_Init(); http_server_netconn_init(); /* Infinite loop */ for(;;) { osThreadTerminate(NULL); } } |
Explaining how the HTTP server works is outside the scope of this post: it would require a dedicated post. All the dirty job is done by the function http_server_serve(), which simply scans the HTTP request for some well known string. The rest of the work is performed by jQuery.
|
54 55 56 57 58 59 60 61 62 63 64 65 66 67 68 69 70 71 72 73 74 75 76 77 78 79 80 81 82 83 84 85 86 87 88 89 90 91 92 93 94 95 96 97 98 99 100 101 102 103 104 105 |
void http_server_serve(struct netconn *conn) { struct netbuf *inbuf; err_t recv_err; char* buf; u16_t buflen; /* Read the data from the port, blocking if nothing yet there. We assume the request (the part we care about) is in one netbuf */ recv_err = netconn_recv(conn, &inbuf); if (recv_err == ERR_OK) { if (netconn_err(conn) == ERR_OK) { netbuf_data(inbuf, (void**)&buf, &buflen); /* Is this an HTTP GET command? (only check the first 5 chars, since there are other formats for GET, and we're keeping it very simple )*/ if ((buflen >=5) && (strncmp(buf, "GET /", 5) == 0)) { if (strncmp((char const *)buf,"GET /index.html",15)==0) { netconn_write(conn, (const unsigned char*)index_html, index_html_len, NETCONN_NOCOPY); } if (strncmp((char const *)buf,"GET /led1", 9) == 0) { HAL_GPIO_TogglePin(LD1_GPIO_Port, LD1_Pin); } if (strncmp((char const *)buf,"GET /led2", 9) == 0) { HAL_GPIO_TogglePin(LD2_GPIO_Port, LD2_Pin); } if (strncmp((char const *)buf,"GET /led3", 9) == 0) { HAL_GPIO_TogglePin(LD3_GPIO_Port, LD3_Pin); } if (strncmp((char const *)buf,"GET /btn1", 9) == 0) { if(HAL_GPIO_ReadPin(User_Blue_Button_GPIO_Port, User_Blue_Button_Pin) == GPIO_PIN_SET) netconn_write(conn, (const unsigned char*)"ON", 2, NETCONN_NOCOPY); else netconn_write(conn, (const unsigned char*)"OFF", 3, NETCONN_NOCOPY); } if (strncmp((char const *)buf,"GET /adc", 8) == 0) { sprintf(buf, "%2.1f °C", getMCUTemperature()); netconn_write(conn, (const unsigned char*)buf, strlen(buf), NETCONN_NOCOPY); } } } } /* Close the connection (server closes in HTTP) */ netconn_close(conn); /* Delete the buffer (netconn_recv gives us ownership, so we have to make sure to deallocate the buffer) */ netbuf_delete(inbuf); } |
The webpages/index.html contains the HTML code. It is transformed in a C string using the UNIX command xxd:
|
1 |
xxd -i index.html > index.h |
and embedded inside the final firmware (the STM32F7 has sufficient FLASH space to store a whole HTML file in it). The web-app is reachable going to http://<nucleo-ip>/index.html.
The complete project can be downloaded from my github account. For any doubt, don't hesitate to contact me.
80 comments
Hello
Thanks for great tutorial !! I just bought Nucleo-F746ZG and STM32F746G-DISCO 🙂 After few hours testing and compiling (i am a newbie with STM32 and eclipse - i just switch from PIC mcu) Your example working with my Nucleo-F746ZG + SW4STM32 (it is a more friendly for me) - only i have problem with MCU Temperature - i see only this - "°C" on webpage.
Hi Carmine
Thank you very much for your very detailed explanations!
I just got an Nucleo-F746ZG but failed to get your project running.
Simply nothing happens 🙁
Is there any notification like a blinking LED or so?
Could you provide a bin file so I can check the HW is working?
I am successfully able to program the bin with openOCD, but I am unable to debug it. My guess is that it crashes immediately. I know openOCD runs correctly because I can use it to program the original demo project which was on the MCU originally.
I've packed the binary files here: http://www.carminenoviello.com/stm32-nucleo144-f7.zip
The IP address is 192.168.1.204
Thank you very much!
I am able to flash your hex file with the ST-Link Utility and run it.
Are you able to flash the hex file through openOCD? I get the following error:
openocd -f "..\scripts\board\stm32f7discovery.cfg" -c "program Binary_von_Blog/stm32-nucleo144-f7.hex 0x08000000 reset exit"
Warn : no flash bank found for address 10000000
wrote 0 bytes from file Binary_von_Blog/stm32-nucleo144-f7.hex in 0.037004s (0.000 KiB/s)
However, when I compile your example (or the example provided by the GNU ARM Toolchain Plugin), I can't get it to run or debug.
Which toolchain version are you using? I tested 4.9 2015q3 and 5.2 2015q4 but neither binary works.
The GCC release should not affect the way the binary is generated. However, try the "flash_write" command, because the "program" one needs that you specify the flash boundary address.
If I'm not wrong, the ST-Link firmware need to be updated. Check if there is an update available. Pay attention that, if you are using a Mac, several people are reporting a severe issue with the latest ST-LINK firmware on MacOS El Capitan.
I have the latest ST-Link firmware!
I am not sure what you mean with "flash_write" as openOCD seems not to know such a command.
Note that the main issue seems not to be openOCD as I am able to use it to flash the demo bin files.
My issue seems to be related to the way it get build.
Download this guide and refer to the chapter 5 (page 67) on how to use the flash write_image command.
The error message you have posted before says that OpenOCD wants to write the binary image starting from 0x10000000 address, which is an invalid address for an STM32F7 (usually, the CCM RAM is mapped there).
Thanks for the link. I have read your coll book before.
I tried it again as you describet through telnet and it works correctly. But when you want to call openOCD directly, it seems not to know this command:
openocd -f "..\scripts\board\stm32f7discovery.cfg" -c "flash write_image erase stm32-nucleo144-f7.elf"
It doesnt know the command:
invalid subcommand "write_image erase stm32-nucleo144-f7.elf"
in procedure 'flash'
But as said before, this is not the issue I have (as I can sucessfully flash the bin files or use the ST-Link Utility).
My issue instead is that the builds are not running at all.
Could you tell me, which toolchain version you are using?
I've recompiled the project with the latest GCC tool-chain (5.2) right now, and it works well (apart from that configuration issue with the LWIP timeval struct).
However, if OpenOCD works use it to debug step-by-step and see what's going wrong. Otherwise it is hard to give help.
Ok, I set now up the toolchain and IDE on a virgin windows. And there the build is working correctly 🙂
So it looks like my setup on my primary PC is somehow messed up. I will now try to re-install it.
Thank you very much for your quick support and the detailed information you share on your blog! I am aware that it costs a lot of time.
Some side notes:
If you are using a more recent toolchain (i.e. GNU Tools ARM Embedded 5.2 2015q4), you will get a compile error:
redefinition of 'struct timeval'
To resolve it, simply disable the define
#define LWIP_TIMEVAL_PRIVATE 1
in sockets.h
The patched version of openOCD supporting the F7 (0.10.0) is now available at http://gnuarmeclipse.github.io/openocd/releases/
Thanks guys for your interesting insights.
As far as struct timeval is concerned, just a detail: I think it is cleaner to use
#define LWIP_TIMEVAL_PRIVATE 0
in lwiopts.h
Sorry, I meant lwipopts.h.
Hi Carmine,
Your demo has the sophistication of simplicity. I am impressed.
I'm currently using the STM32F7-Discovery instead of the Nucleo board because it has a micro SD-card slot that I would like to use. I had no problem getting the board up and running and answering my pings adapting your instructions.
I am wondering if you could quickly summarize your procedure for the HTTP/HTML/Javascript parts. I am mostly wondering where the different parts come from. More specifically:
- HTTP server: am I correct that the LwIP HTTP server code does not come from CubeMX? Did you fetch it manually from Cube? Did you start from a specific example/template?
- HTML/Javascript: did you write the index.html file manually, or is it partly generated by bootstrap? I am not experienced with bootstrap. Any advice on how to go from scratch to your HTML-file by myself?
Thanks in advance for any advice.
Regards,
Alain
Hi Alain,
No, the LwIP HTTP server is generated by CubeMX. You have to enable first the RTOS middleware, and then LwIP. If you are using the GNU ARM Eclipse plugin, my script can also handle the import of LwIP stack in your project.
The file is generated manually by me. Bootstrap is a JS/CSS framework you can import in your HTML pages and use it. It's not too much complex to use (I've to admit that I've a past as web developer 🙂 ), and it allows you to develop responsive, multi-browser and mobile-ready web application with a little bit of effort. The web page (index.html - attached in the project) is then converted in a C const variable using the xxd tool in UNIX. Since the F7-Discovery have a MicroSD card reader, you could simply place it on a microsd and use FATFS library to access to it. It would be the most clean solution.
> No, the LwIP HTTP server is generated by CubeMX. You have to enable first the RTOS middleware, and then LwIP. If you are using the GNU ARM Eclipse plugin, my script can also handle the import of LwIP stack in your project.
Interesting. I did use your script, but did not see any http related file in my project. I will check again this evening. Thanks a lot.
Alain
Do you mean that the CubeMX project includes httpserver-netconn.c and httpserver-netconn.h? It does not for me. I have just generated the Nucleo-F746ZG project and am looking at the generated files right now (directly from CubeMX, your script has not yet been involved). All the files under Inc and Src are there (FreeRTOS, lwip, etc.), except http-server.netconn.c and .h. I am using CubeMX 4.13.0. Have they removed it in the updgrade?
Regards,
Alain
Sorry Alain, it's my fault. I've misunderstood the question.
I've arranged the content of httpserver-netconn.c from several examples provided by ST. If do a "find" inside the CubeHAL you should see several examples.
No problem. That's what I thought then. I have seen the examples in Cube. The HTTP server is extremely simple, and your solution based on static HTML + JQuery is more elegant than ST's dynamic HTML. I love the simplicity of:
sprintf(buf, "%2.1f °C", getMCUTemperature());

write(buf);
No XML or other cumbersome format, which I though was necessary with AJAX. I didn't know solutions existed that made transfer of data to a static page that simple.
Regards,
Alain
Hi Carmine,
I am a student and I am trying to work with NUCLEO F746ZG and X-NUCLEO IKS01A1 (this is an expansion board with sensors). Have you ever developed code to configure nucleo board for communication with this kind of expansion board?
Hi Valeria,
I've one of these expansion shields, but I've never played with it. I'm too busy right now, but I'll give a look to it in the next days to see if I can arrange a test project.
Ok, thank you so much for your kindness! I'm in a big mess...
Hi Valeria,
I've successfully imported the shield library in this project. You can find the full project here:
https://github.com/cnoviello/stm32-nucleo144-f7-iks01a1
I've not too much time to explain what I did, but I essentially imported the official ST library in the project described in this post. It simply shows the Humidity. It's up to you to check that other sensors works too.
Good luck.
Hi Carmine,
I'm a collegue of Valeria and I tried to import and compile your project with iks01a1 libraries, but I have this error in compilation: conflicting types for 'lwip_select' in sockets.c (path = /stm32-nucleo144-f7-iks01a1/Middlewares/Third_Party/LwIP/src/api). How is that possible?
Hi,
Which toolchain are you using? Can you post the complete compiler message (a screen capture is also good)?
I'm using the toolchain you suggest, GNU ARM Eclipse plug-ins by Liviu Ionescu.
This is he compiler results
http://imgur.com/EvlcRqh
Have you imported the project using the Eclipse Import feature?
Conflicting type errors happen when a function ("lwip_select" in our case) is redefined elsewhere. You are redefining the same function in your code, or there is something nasty happening with the project import. I can guarantee that it compiles well.
Thank you very much Carmine!
Hello,
I flash your hex file with the ST-Link Utility V1.9.0, but it display an error:illegal parameter? Is the file wrong?
Hi,
the binary is for the Nucleo-F746ZG. Usually, that message appear when there is something wrong with the chip option bytes (a full erase is suggested) or the USB doesn't provide the right power to the ST-LINK interface.
Hi Carmine, I've run you HTTP-Server project and it works fine, but I've thought that it can be useful to implement a socket communication in C with an application that runs on a PC. I'm working in this direction but after socket creation my application sleeps on read method. Have you ever tried to do something similar?
Hi Valeria,
It's hard to say what could be wrong. Too few information. You need to perform low-level TCP packet sniffing to try understanding what's going wrong. Is the TCP connection started at least? Can you see ACK packet from the board to the PC? Have you a traceback?
Moreover, are you trying to perform the read from a FreeRTOS thread? If so, does the thread have sufficient stack room?
re NUCLEO_F746ZG
I downloaded gnuarmeclipse-openocd-win64-0.10.0-201601101000-dev-setup.exe which has stm32f7discovery.cfg but no st_nucleo_f7.cfg.
Has anyone used stm32f7discovery.cfg on eclipse with a NUCLEO_F746ZG board?
Yes, it's ok to use the stm32f7discovery.cfg file with the Nucleo-F746.
Is the spacing of the outside solder pads (like the CN11 connector) .1"?
Yes, they are 100mils spaced connectors (2.54mm).
Hi great tutorial!
I have used system workbench with cubemx to essentially recreate the same project. Also purchased your great PDF book, exactly what I have been looking for!
One thing I note is as one of the above questions is the the MCU temp is just showing °c, any ideas?
Cheers
Boondoggler
You need to enable float support in printf()/scanf() routines. Give a look to the book: it's explained somewhere (close to pg. 255).
Great thanks all good now
🙂
Looks like your python script doesn't work anymore with STM23CubeMX version 45.16.1 generated code.
I get an error about it not for the SW4STM32 tool chain. (Even thopugh that's what I selected in STM32BubeMX)
The way it fails depends on the new checkbox ''Generate under root' ..
Checkbox checked:
C:\CubeMXImporter>python cubemximporter.py C:\stm32\workspaces\web\nucleof746_web C:\stm32\cubexm\nucleo-f7
Traceback (most recent call last):
File "cubemximporter.py", line 520, in
cubeImporter.cubeMXProjectPath = args.cubemx_path
File "cubemximporter.py", line 72, in setCubeMXProjectPath
"The generated CubeMX project is not for SW4STM32 tool-chain. Please, regenerate the project again.")
__main__.InvalidSW4STM32Project: The generated CubeMX project is not for SW4STM32 tool-chain. Please, regenerate the project again.
Checkbox NOT checked:
C:\CubeMXImporter>python cubemximporter.py C:\stm32\workspaces\web\nucleof746_web C:\stm32\cubexm\nucleo-f7
Traceback (most recent call last):
File "cubemximporter.py", line 520, in
cubeImporter.cubeMXProjectPath = args.cubemx_path
File "cubemximporter.py", line 54, in setCubeMXProjectPath
self.detectHALInfo()
File "cubemximporter.py", line 221, in detectHALInfo
"The generated CubeMX project is not for SW4STM32 tool-chain. Please, regenerate the project again.")
__main__.InvalidSW4STM32Project: The generated CubeMX project is not for SW4STM32 tool-chain. Please, regenerate the project again.
~ Paul
That should have read: STM32CubeMX version 4.16.1 !!
Hi Paul,
I've tested the script with the latest CubeMX and it works correctly. Are you using the latest version of my script? The latest release doesn't care about the location of the SW4STM32 project file.
Hi Carmine,
Nice blogs very descriptive posts for a beginner, but I am still getting the same issue as mentioned by PAUL.
I have used different versions of "cubemximporter.py" (0.1 to 0.2.2)but I am still getting that project is not built with the SW4STM32 toolchain in spite of building one. Can you please let me know where am I going wrong.
CubeMX version is 14.19.0
SW4STM32 is selected and "Generate Under Root" checkbox is chosen/selected/checked.
Better copy the files manually, it's easy when you do it a second time.
I have windows, and I could not execute the script
Hi Carmine,
Will you cover any basics of DSP in your Mastering STM32 book at some time later on ? I am not really familiar with DSP but as far as I understand it, some operations might be executed faster by using it ?
Regards
Hi Mateusz,
Actually I don't think I'll cover DSP in the book. There are other relevant topics I need to cover before, and the book is becoming too huge. This would require a lot of space and time that I no longer have.
Hi Carmine,
I want to add a Nucleo expansion board to the F746ZG. So I've downloaded the associated expansion board STM32Cube zip on ST website.
In this zip I have a Middleware folder with all the files that seems to really simplify coding and communication with the expansion board.
However I don't know how to add this properly to AC6 environment... At the moment I just drag and drop the folder inside the Project Explorer. But when I wan't to include a header from this expansion Middleware library, the project cannot compile any more "***.h: No such file or directory".
I think I'm not adding the STM32Cube folder in the right way.
Thanks for help
regards
When importing Cube expansion libraries, you need to check two things:
- That imported folder and files are not excluded from build
- You need to add folders containing ".h" files to the list of include folders in project settings.
These steps are usually sufficient to import Middleware libraries.
Thank you very much for this tutorial!
I used this tutorial in combination with the STM32F429-Nucleo.
I now have a working example with Atollic Truestudio 7.0.0 and STM32CubeMX 4.18.0. I followed the STMcube "user code begin" and "user code end" comments so regeneration is possible.
Is it okay if i post my code to github, with of course a link to this page? So that other people can use the example.
Yes. You are totally free to do it 😉
Hi!
Nice to hear, you can find my repository here:
http://www.github.com/DutchEngineer/STM32F429_NUCLEO_LWIP_FREERTOS
At the moment I am working on a Python script to convert .html .css .js and .ico files to c string. I am not using Linux so i don't have xxd.
I will also post a link here as soon as I have finished it.
Carmine,
You are a brilliant engineer! Thank you for sharing your work.
Bill
Thanks for the awesome tutorial!
When building I get the following error:
Description Resource Path Location Type
make: *** [Middlewares/Third_Party/LwIP/src/core/init.o] Error 1 stm32-nucleo-f746zg-http-server C/C++ Problem
recipe for target 'Middlewares/Third_Party/LwIP/src/core/init.o' failed subdir.mk /stm32-nucleo-f746zg-http-server/Debug/Middlewares/Third_Party/LwIP/src/core line 66 C/C++ Problem
redefinition of 'struct timeval' sockets.h /stm32-nucleo-f746zg-http-server/Middlewares/Third_Party/LwIP/src/include/lwip line 442 C/C++ Problem
Any ideas?
To resolve it, simply disable the define
#define LWIP_TIMEVAL_PRIVATE 1
in sockets.h
Thanks, it worked. Had some other strange errors, which were resolved by restarting eclipse, cleaning and then building again.
Carmine,
It seems the ARM plug-in has changed over time, and the now File->New->C Project dialog do not match up with the examples above. There is no "Hello World ARM Cortex-M C/C++ Project".
Neither Hello World ARM C Project nor STM32F7xx C/C++ Project give satisfactory results.
Eclipse Neon.2
GNU ARM plug-in 201701141320
Bill
This happens because the installation is changed a little bit. Take a look to the installation instructions in my book:
http://samples.leanpub.com/mastering-stm32-sample.pdf
Hi Carmine,
In this tutorial and in your book Mastering-STM32, to help the reader getting the correct information on the Flash and RAM size easily without referring to datasheet or other ways, I suggest to build the CubeMX project first and then the Eclipse instead of the other way around as you had done. The reason is that after building the CubeMX project, we can correctly read the memory Length and Origin information from the generated linker description file STM32XXXX_FLASH.ld and then use this information to fill in the Target Processor Setting step during Eclipse project building as below:
MEMORY
{
FLASH (rx) : ORIGIN = 0x08000000, LENGTH = 1024K
RAM (xrw) : ORIGIN = 0x20000000, LENGTH = 320K
...
Another suggestion. On page 132 and 133 of Mastering-stm32, the instruction of how to Add the corresponding STM32xx processor name (used as conditional macro) to the Cross ARM GNU C Compiler's Preprocessor (since the STM HAL is designed to work with all MCU), it was not too clear for me what to do.
It says "...and then click on Add icon. Use the macro corresponding to your Nucleo.....". I wasn't sure what to do with the new opened window with Defined Symbols (- D). So instead of saying "Use the macro corresponding...." (this sounds more like selecting the right macro name from the drop-down list), I think it's more clear to say "Type in the macro name corresponding to your Nucleo (refer to Table 3....)....".
Question: I am using NucleoF722ZE but cannot find the st_nucleo_f7.cfg file under \openocd\scripts\board\ . What should I do (to use openocd for debugging)?
Best,
Brian
Do you know how to get access to the application from outside the local network?
Hi Carmine,
you are really brilliant!!
I was wondering if you have a working example of telnet and ftp servers for STM32F746ZG Nucleo. I have the ping working but need a quick telnet and ftp servers. Any help would be highly appreciated.
Hi Carmine,
I what to test your example on an Nuclueo 144 STM32F429ZI Board.
The build does not work.
Building file: ../system/src/cmsis/system_stm32f429.c
Invoking: GNU ARM Cross C Compiler
arm-none-eabi-gcc -mcpu=cortex-m4 -mthumb -mfloat-abi=hard -mfpu=fpv5-sp-d16 -Og -fmessage-length=0 -fsigned-char -ffunction-sections -fdata-sections -fno-move-loop-invariants -Wall -Wextra -g3 -DDEBUG -DOS_USE_SEMIHOSTING -DTRACE -DOS_USE_TRACE_SEMIHOSTING_DEBUG -DSTM32F429xx -I"../include" -I"../system/include" -I"../system/include/cmsis" -I"../system/include/stm32f429" -I"../system/include/stm32f4xx" -I"../system/include/cmsis/device" -I"../Middlewares/Third_Party/LwIP/src/include" -I"../Middlewares/Third_Party/LwIP/system" -I"../Middlewares/Third_Party/FreeRTOS/Source/portable/GCC/ARM_CM4F" -I"../Middlewares/Third_Party/FreeRTOS/Source/include" -I"../Middlewares/Third_Party/FreeRTOS/Source/CMSIS_RTOS" -I"../Middlewares/Third_Party/LwIP/src/include/lwip" -I"../Middlewares/Third_Party/LwIP/src/include/lwip/apps" -I"../Middlewares/Third_Party/LwIP/src/include/lwip/priv" -I"../Middlewares/Third_Party/LwIP/src/include/lwip/prot" -I"../Middlewares/Third_Party/LwIP/src/include/netif" -I"../Middlewares/Third_Party/LwIP/src/include/netif/ppp" -I"../Middlewares/Third_Party/LwIP/src/include/netif/ppp/polarssl" -I"../Middlewares/Third_Party/LwIP/src/include/posix" -I"../Middlewares/Third_Party/LwIP/src/include/posix/sys" -I"../Middlewares/Third_Party/LwIP/system/arch" -std=gnu11 -MMD -MP -MF"system/src/cmsis/system_stm32f429.d" -MT"system/src/cmsis/system_stm32f429.o" -c -o "system/src/cmsis/system_stm32f429.o" "../system/src/cmsis/system_stm32f429.c"
In file included from ../system/include/cmsis/stm32f429.h:147:0,
from ../system/src/cmsis/system_stm32f429.c:40:
../system/include/cmsis/core_cm4.h:153:8: error: #error "Compiler generates FPU instructions for a device without an FPU (check __FPU_PRESENT)"
#error "Compiler generates FPU instructions for a device without an FPU (check __FPU_PRESENT)"
^
make: *** [system/src/cmsis/system_stm32f429.o] Error 1
system/src/cmsis/subdir.mk:38: recipe for target 'system/src/cmsis/system_stm32f429.o' failed
I set the parameter in the project to "FP instructions(hard)" and "fpv5-sp-d16". Proably there is the fault. Do you now the right parameter?`
Thanks
Markus
Hi friend. I have a small problem.
Can anybody give me a file from stmcube mx for this project? Thank you
Hi Carmine,
I wonder if it is possible to ping a web site with the board in order to get time and date
I tried this code with another of the STM32 Nucleo-144 boards, the NUCLEO-STM32F429ZI ,and it worked great. ( using STM32CubeMX and Keil MDK5 ).
The only problem I had is it did not seem to work at first. My bad - I was forgetting to add /index.html after the IP address.
Great job - thanks Carmine!
hello Carmine,
I am facing trouble with python importer tool can you upload video for this post on youtube.
Hi Carmine,
When I found your post, I immediately decided to put my arduino in the drawer to get a Nucleo board!
Your example allowed me to make my little project a lot more fun.
But, ther is one thing that I cannot accomplish and help would be very appreciated ...
Can you show us an example of how to read with the Nucleo a number input entered in the web browser?
Thank you for everything I learned on your blog!
Nice job!
Salve, in queste schede st nucleo f7 come posso implementare una memoria eeprom esterna compatibile arduino?
Mi serve per salvare delle variabili staccando l'alimentazione.
Grazie per l'aiuto a tutti.
Hi Carmine,
I've bought your book on Leanpub and found it very helpful.
I only have a couple of simple questions:
1. Are you going to update the book with more details on F746 etc.?
2. I am trying to add QSPI memory to the F746ZG board using a more recent flash memory IC (N25Q128A is obsolete), I have tried various memories (e.g. S25FL256 etc.) and used a modified N25Q128A.h and code from the F746G disco examples on MBED, without success. Can you point me in the direction of any useful tips or software?
Thanks,
Chris
Hello Carmine Noviello,
I want to implement an application won STM32F429Zi Nucleo which should have CDC enable, ETH TCP/IP and one LED blink task with FreeRTOS.
I tried few codes by assembling after implementing them separately but unfortunately enable to get success on that idea, it through 2 error while going to init the ETH which is nothing but some kind of Assertion error listed here :
Assertion "failed to create tcpip_thread mbox"
Assertion "failed to create lock_tcpip_core"
Do i miss something or anything that i have to configure or i have to understand.
Can you please help me,
Thank you in advance!
Note : I'm using HAL library.
Hello Carmine Noviello,
Thank you very much for your detailed explanation on this example for the Nucleo-F746ZG board. This example implements the HTTP Server via the netconn API of LwIP stack with FreeRTOS. It is working well, and i wish to check with you that is it possible to implement the HTTP Server via Socket API of LwIP?
Hello Carmine Noviello,
very nice example - works fine.
Is there any posibility to send values (e.g. integer) from the webpage to the uC during process?
For example: If I would have an slider on my webpage, how would I get its actual value to my uC?
Thank you!
Hello Stefan what compiler have used in that eclipse
Dear Sirs,
I'm using CubeIDE and activated the floating printf but always showing "TEMP" in MCU temp section.
When I un-check the floating printf activation, always shows only Degree unit. Any idea ? LED button and User button reading is working perfectly.
BR
Hello Sir,
Thanks for this great tutorial.
I tried to implement this in my STM32F429ZI but I am getting a redefinition ERROR while compiling.
The SysTick_Handler() function that you instructed to edit in the stm32f7xx_it.c was not available in my case(stm32f4xx_it.c). I added the function as in your file.
When I tried to build the code, I am getting an error stating that the void SysTick_Handler(void) function is already defined in port.c as xPortSysTickHandler.
#define xPortSysTickHandler SysTick_Handler is declared in FreeRTOSConf.h
I cross checked in your github repository and i am found that FreeRTOSConf.h does not esist in your case and the above definition does not esist in your case.
Hoe do I rectify this error?
Great project thank you.
Sadly, try as I might I cannot get the script to run on an iPad or iPhone regardless of which browser I use, have tried Safari, Edge, Chrome and Firefox. The page loads fine but the led switches, blue button status and temperature reading don’t work.
It won’t run on Safari on an iMac either though Microsoft Edge does work and it also works on a Windows 10 PC with Edge.
can we apply this project to stm-32 nucleo-767zi board
Can we apply this project to stm-32 nucleo-767zi board?
Ottima novità, peccato che in Europa i tempi di consegna sono un po' lunghi. Per esempio Mouser da 53 settimane, mentre in Farnell non prima di fine luglio.