
Using a micro like the STM32F4, able to run up to 160Mhz, with 512Kb of flash and about 100k of RAM, without using an operating system is a nonsense. Although it's perfectly possible to use some forms of cooperative scheduling to execute firmware activities, basically this not convenient especially when dealing with low level events related to hardware (eg. interrupt handling) and aspects related to synchronization. As long as your firmware starts to grow, you'll need constructs to synchronize firmware activities, like queues or semaphores. Moreover, especially when dealing with low-power devices, a busy spin (while(some condition);) it's not the best solution if you have to fight with mAh.
FreeRTOS is probably the most diffused Real Time Operating System in the embedded world. There are several RTOSes around, both free and commercial, but probably FreeRTOS is the one that reached the maximum diffusion. I think that there are other valid alternatives to FreeRTOS, but there is no doubt that it's the most popular one with a good and official support from several MCU vendors. ST also provides a complete support to this OS, and it's distributed as middleware component inside the STCubeF4 framework. Moreover, STCubeMX tool is able to generate all the necessary code to initialize it.
Many of you asked me a tutorial on how to use FreeRTOS on the STM32Nucleo developing board using a free GCC/Eclipse tool-chain. As we'll se, once a complete tool-chain is defined, it's not a complex task to start programming with FreeRTOS. We'll develop a simple blinking led application, the "Hello world" of all hardware projects, and we'll use this project to show how to configure FreeRTOS and how to use tasks and semaphores.
System requirements
As for past tutorials, I won't show you all the steps needed to setup the whole GCC/Eclipse tool-chain, but I'll assume:
- A complete Eclipse/GCC ARM tool-chain with required plugins as described in this post. I’ll assume that the whole tool-chain in installed in C:\STM32Toolchain or ~/STM32Toolchain if you have a UNIX-like system.
- The STM32Cube-F4 framework from ST already downloaded and extracted inside the ~/STM32Toolchain/STM32Cube_FW_F4 directory (if your board is based on another STM32 family, download the corresponding STM32Cube package – I’m almost sure that the instructions are perfectly compatible).
- The latest version of FreeRTOS (it can be download from here - I've successfully tested the 8.2.1 release) extracted inside the ~/STM32Toolchain/FreeRTOSV8 directory.
- A STM32Nucleo-F401RE board (as I said before, arrange the instructions for your Nucleo if it differs).
First step: create a skeleton project
In the first step of this tutorial we'll create a skeleton project. Once created, we'll import inside the project all the FreeRTOS related files. The procedure is almost the same described in this post, but I'll describe it again to clarify some steps. Then, we'll use CubeMX to generate configuration files we need to setup FreeRTOS and the main.c file.
[box type="info" align="aligncenter" class="" width=""]If you are not interested in repeating the whole procedure, you can download the project from my github repository and rearrange it if your tool-chain configuration differs.[/box]
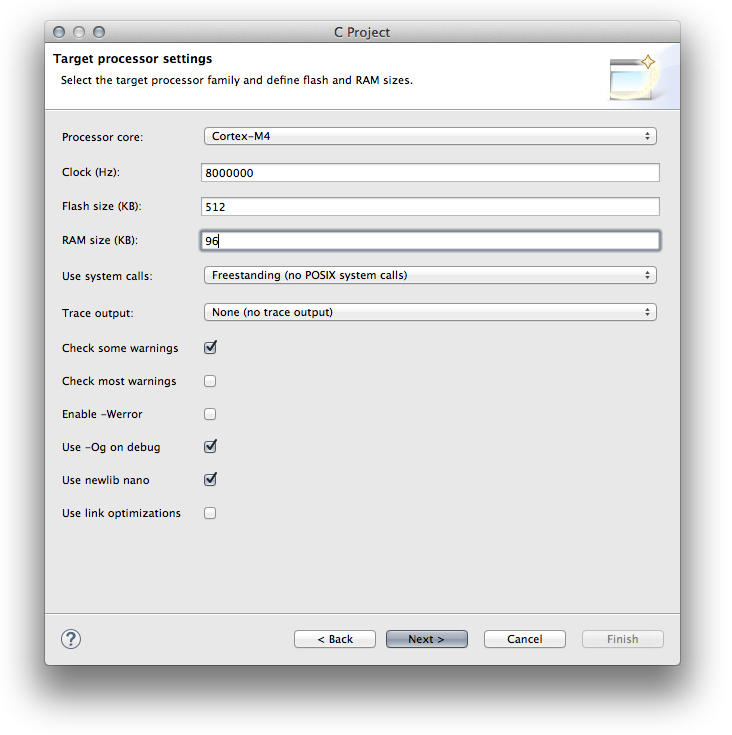
So, let's create a basic project where we’ll put HAL library from ST and FreeRTOS sources. Start Eclipse and go to File->New->C Project and select “Hello World ARM Cortex-M C/C++ project. You can choose the project name you want (I chose “stm32-nucleof4-freertos“). Click on “Next“. In the next step you have to configure your processor. For a STM32-F4 you have to choose Cortex-M4 core, while for a STM32-F1 you have to choose Cortex-M3. The Clock, Flash size and RAM parameters depend on your Nucleo MCU. For Nucleo-F401RE you can use the same values shown in the following picture. Set the other options as shown below.
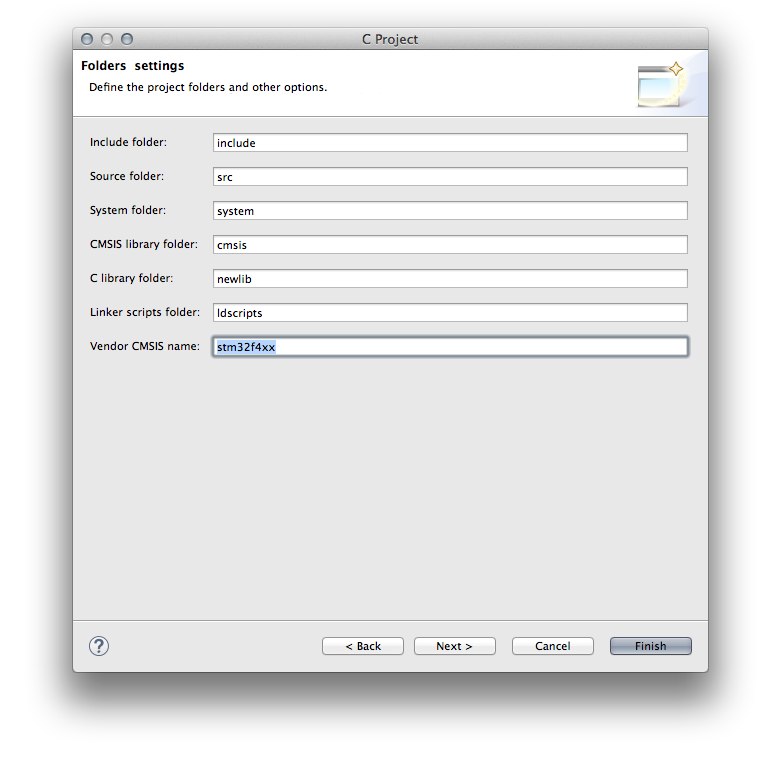
In the next step leave all parameters unchanged except for the last one: Vendor CMSIS name. Change it from DEVICE to stm32f4xx if you have a STM32F4 based board, or stm32f1xx for F1 boards, and so on.
Click on “Next“. You can leave the default parameters in the next steps. The final step is about the GCC tool-chain. You can use these values:
tool-chain name: GNU Tools for ARM Embedded Processors (arm-none-eabi-gcc)
tool-chain path: C:\STM32Toolchain\gnu-arm\4.8-2014q3\bin.
The project generated by GNU ARM Plug-in for Eclipse is a skeleton containing Cortex Microcontroller Software Interface Standard (CMSIS) by ARM. However, the CMSIS package is not sufficient to start programming with a STM32 chip. It’s also required a vendor specific Hardware Abstraction Layer (HAL). In this tutorial I won't go into details of the project structure. If you need to know more about what the GNU ARM Plugin has generated, please refer to this other post.
Now, go in the Eclipse project and delete the following files:
- /src/[main.c, Timer.c]
- /include/Timer.h
- /system/include/cmsis/[stm32f4xx.h,system_stm32f4xx.h]
- /system/src/cmsis/[system_stm32f4xx.c,vectors_stm32f4xx.c]
Now we have to copy HAL and other files from STM32Cube to the Eclipse project.
- HAL: go inside the STM32Cube_FW_F4/
Drivers/STM32F4xx_HAL_Driver/Src folder and drag ALL the files contained to the Eclipse folder /system/src/stm32f4xx. Eclipse will ask you how to copy these files in the project folder. Select the entry “Copy”. Next, go inside the STM32Cube_FW_F4/Drivers/STM32F4xx_HAL_Driver/Inc folder and drag ALL the files contained to the Eclipse folder /system/include/stm32f4xx. When finished, go inside the Eclipse folder /system/src/srm32f4xx and delete the file stm32f4xx_hal_msp_template.c (we'll use the one generated by CubeMX tool later). - Device HAL: go inside the STM32Cube_FW_F4/Drivers/CMSIS/Device/ST/STM32F4xx/Include folder and drag ALL the files contained to the Eclipse folder /system/include/cmsis.
We now need another two files. If you remember, we've deleted so far two files from the generated project: system_stm32f4xx.c and vectors_stm32f4xx.c. We now need two files that do the same job (essentially, they contain the startup routines). The file vectors_stm32f4xx.c should contain the startup code when MCU resets. We'll use an assembler file provided by ST. Go inside STM32Cube_FW_F4/Drivers/CMSIS/Device/ST/STM32F4xx/Source/Templates/gcc folder and drag the file corresponding to your MCU inside the Eclipse folder /system/src/cmsis. In our case, the file is startup_stm32f401xe.s. Now, since Eclipse is not able to manage files ending with .s, we have to change the file extension to .S (capital 's'). So the final filename is startup_stm32f401xe.S.
Just another step. We still need a system_stm32f4xx.c file, but we need one specific for the MCU of our board. Go inside the STM32Cube_FW_F4/Drivers/CMSIS/Device/ST/STM32F4xx/Source/Templates folder and drag the system_stm32f4xx.c file inside the Eclipse folder /system/src/cmsis.
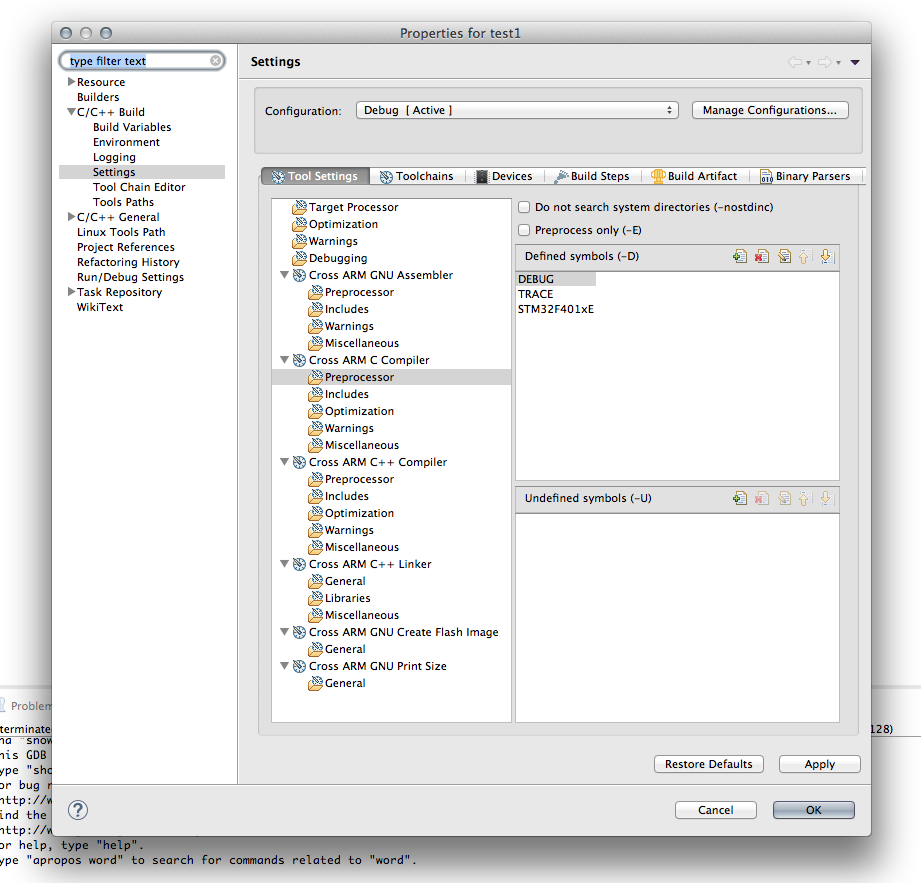
Ok. The HAL is mostly configured. To complete this part, we have to set a couple of things. First, we need to set a project global macro that defines our MCU type. This macro is required to compile the HAL correctly. For Nucleo-F401RE the macro is STM32F401xE (arrange it for your board if differs). Go inside the project properties (on the main Eclipse menu go to Project->Properties), then C/C++ Build->Settings. Click on Tool Settings and go in Cross ARM C Compiler->Preprocessor. Click on the Add icon (![]() ) and add the macro STM32F401xE.
) and add the macro STM32F401xE.
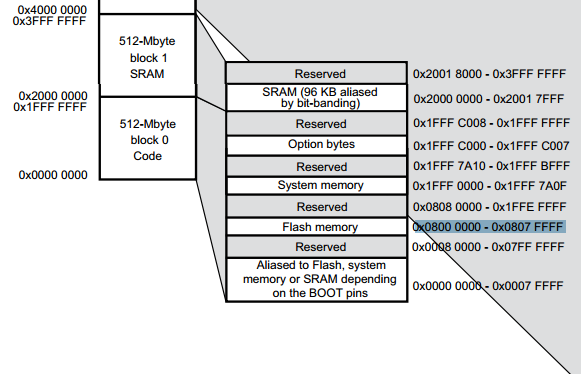
Second, we need to configure how the application is mapped in the MCU memory. This work is accomplished by the link-editor (ld), which uses the three .ld files inside the /ldscripts Eclipse folder. The file we are interested in is mem.ld, and we need to change the FLASH origin address from 0x00000000 to 0x08000000, as shown below:
|
1 2 3 |
... FLASH (rx) : ORIGIN = 0x08000000, LENGTH = 512K ... |
Where does this number come from? It's not a magic number. It's simply the address where the internal MCU flash is mapped in all STM32 microcontrollers, as you can see in the picture below extracted from the MCU datasheet.
Second step: import FreeRTOS sources in the project
The next main step is importing the FreeRTOS source files inside the project. ST already distribute with the STM32Cube framework a complete FreeRTOS source tree. However, it's not the latest available version. So we'll use the official release as stated in the System requirements paragraph.
Before staring importing files, we need two Eclipse folders in our project. Create one folder named FreeRTOS inside the /system/include/ folder and another one inside the /system/src folder. Now:
- go inside STM32Toolchain/FreeRTOSV8.2.1/FreeRTOS/Source/include folder and drag ALL files contained to the Eclipse folder /system/include/FreeRTOS;
- go inside STM32Toolchain/FreeRTOSV8.2.1/FreeRTOS/Source folder and drag ALL ".c" files to the Eclipse folder /system/src/FreeRTOS;
Now we need another couple of things. FreeRTOS is designed to be independent from the specific hardware. It's able to run on 35 different architectures and several compilers, both commercial and free. The part related to the specific hardware and compiler is contained inside the STM32Toolchain/FreeRTOSV8.2.1/FreeRTOS/Source/portable folder. So:
- go inside
STM32Toolchain/FreeRTOSV8.2.1/FreeRTOS/Source/portable/GCC/ARM_CM4F folder and drag the file port.c inside the Eclipse folder /system/src/FreeRTOS and the file portmacro.h inside the Eclipse folder /system/include/FreeRTOS .
We still need another file from FreeRTOS distribution. FreeRTOS offers several heap management schemes that range in complexity and features. It's out of the scope of this article to explain the differences between the 5 heap schemes provided in FreeRTOS. What is important for us now, is that we need to import one of these schemes inside our Eclipse project. So:
- go inside STM32Toolchain/FreeRTOSV8.2.1/FreeRTOS/Source/portable/MemMang folder and drag the file heap_2.c inside the Eclipse folder /system/src/FreeRTOS (we need at least heap_2.c because we'll use osThreadTerminate() to terminate a task).
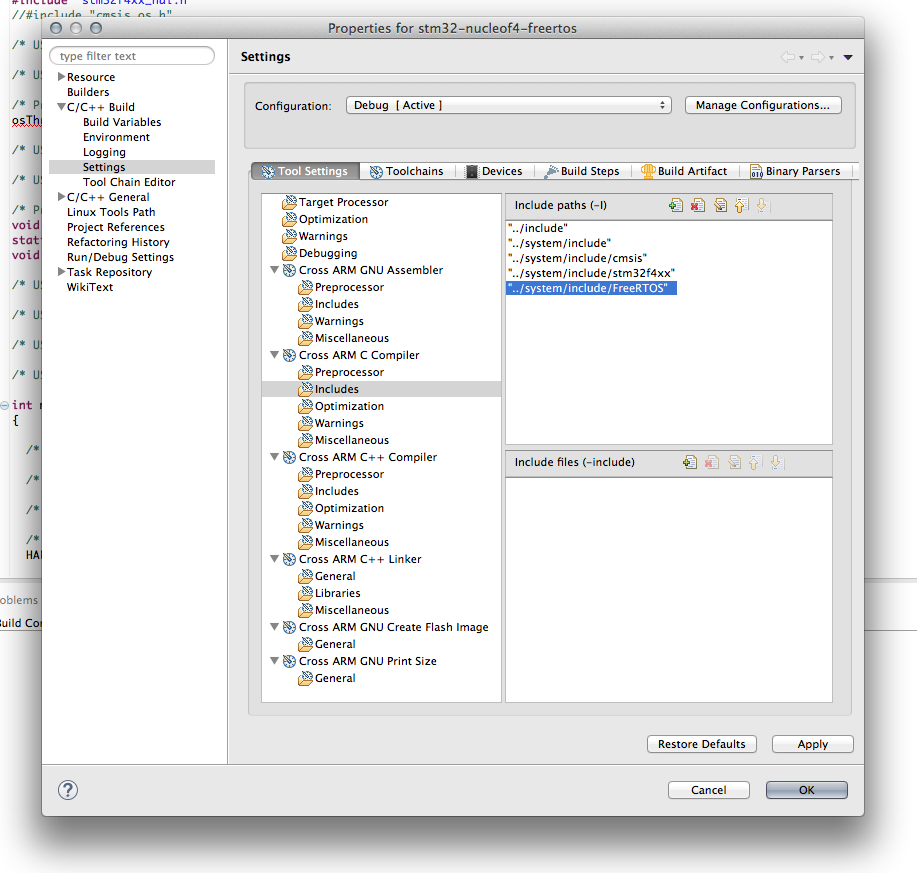
Ok. FreeRTOS is almost configured. We only need two other things. First of all, we have to make Eclipse aware of FreeRTOS include files. This means that we have to add /system/include/FreeRTOS folder inside the project include paths. Go inside the project properties, then C/C++ Build->Settings. Click on Tool Settings and then Cross ARM C Compiler->Includes and add the folder as shown below.
[box type="warning" align="aligncenter" class="" width=""]If your Nucleo is not based on a STM32F4 MCU, you have to skip the next step.[/box]
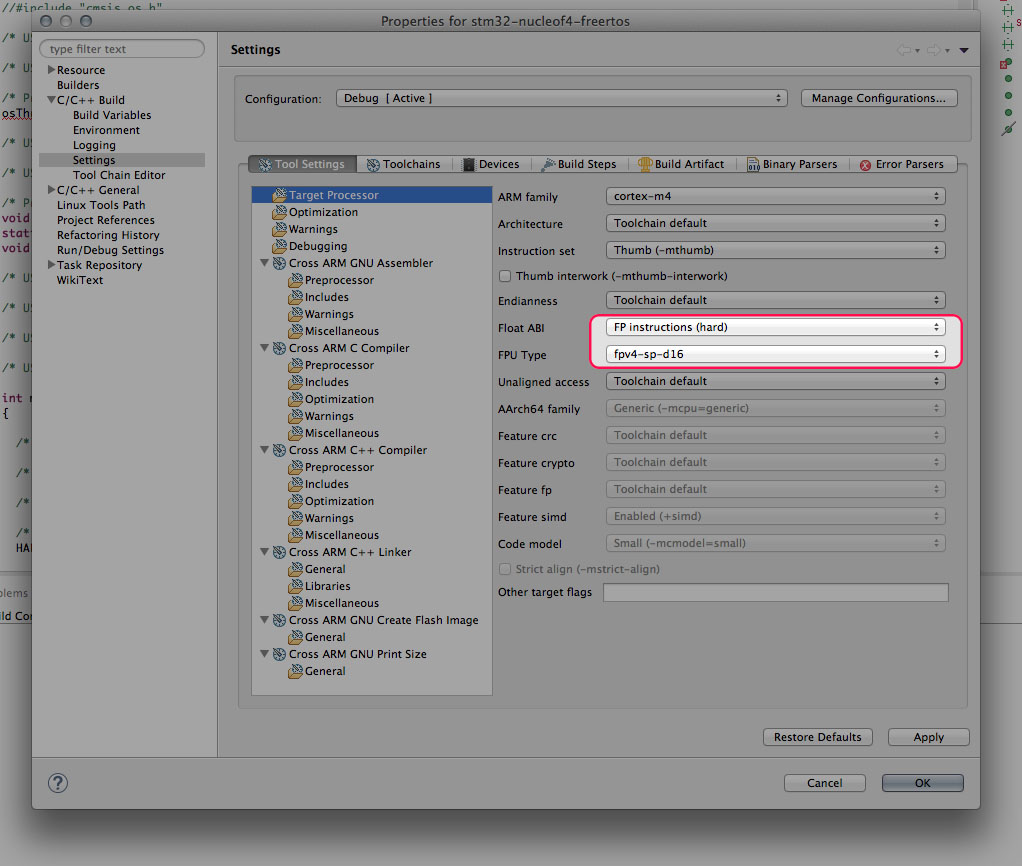
Next, the FreeRTOS port for Cortex-M4 processors relys on the fact that Cortex-M4 processors have a dedicated Floating Point Unit (FPU). So, it's required that we enable this at compile time adding a specific command line parameter to GCC: -mfpu=fpv4-sp-d16. This can be simply done in Project settings. As before, go inside the project properties, then C/C++ Build->Settings. Click on Tool Settings and then Target processor and change Float ABI and FPU Type parameters as in the following screen capture.
Step three: generate initialization files using CubeMX
As said before, ST gives full support to FreeRTOS. This dramatically simplifies all the configurations steps needed to initialize FreeRTOS. We'll use now CubeMX tool to generate all the code needed to setup our FreeRTOS based application.
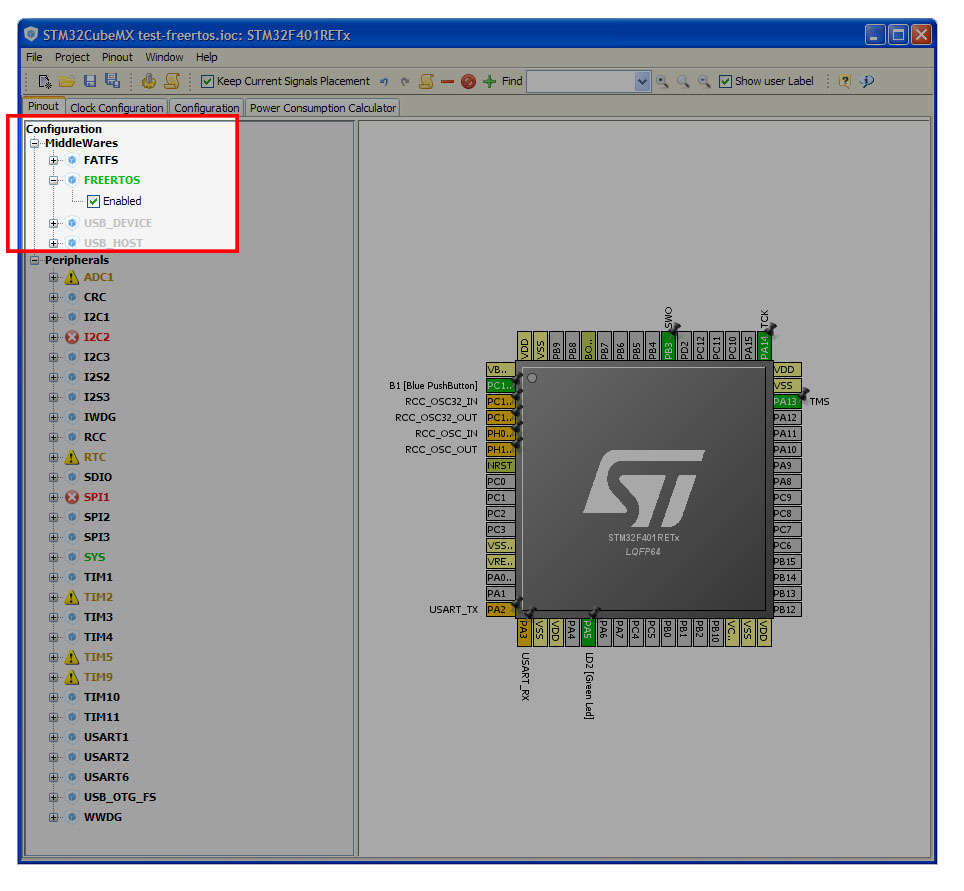
Start STM32CubeMX and go to “New Project“. Click on the tab “Board Selector”. In “Type of Board” choose Nucleo. In the “MCU Series” drop-down list choose your Nucleo target MCU version. Next, in the column labeled “Peripheral Selection“add “1” to rows Led and Button. In the “Board List” table, choose your exactly Nucleo version.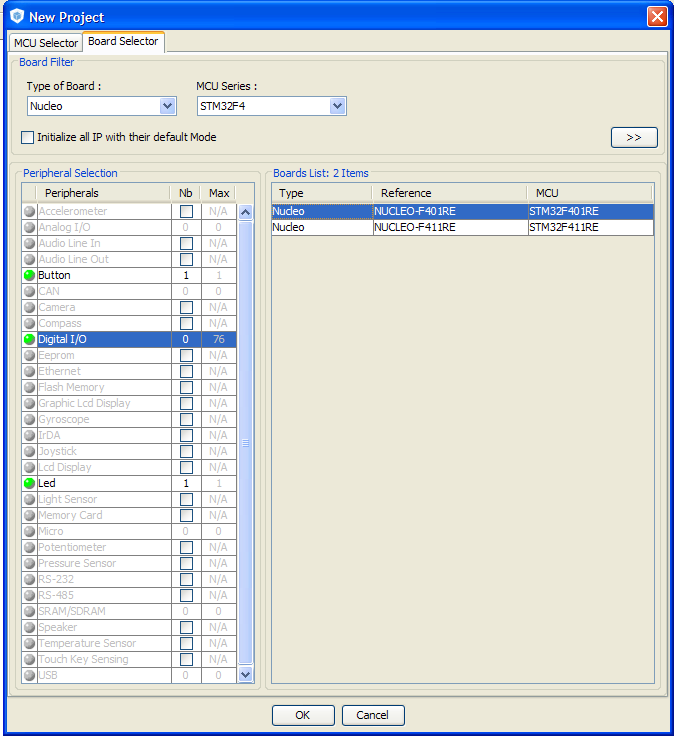 Click on “OK“. CubeMX will show your target Nucleo MCU and its configuration. Now we have to enable FreeRTOS. In the tree view on the left side, open the FreeRTOS entry, and check "Enabled", as shown below.
Now go to “Project->Generate Code” and fill the fields like in the following picture (arrange paths at your needs).

Click on “OK” button. CubeMX will ask us if we want to download the latest version of STM32Cube framework. In our case, we can choose “NO” since we don't need it. Click on “Continue” in the next message box. When the generation ends, click on “Open Folder” Now:
- go inside the test-freertos/Src folder and drag ALL the content inside the Eclipse folder /src;
- in the same way, go inside the test-freertos/Inc folder and drag ALL the content inside the Eclipse folder /include.
Adding the CMSIS-OS wrapper from ST
In theory, what we have done until here is sufficient to start programming with FreeRTOS. However, if we rely on what is generated by CubeMX tool we aren't still able to compile the code correctly. The generated code is based on CMSIS-RTOS API, which is an abstract and standardized API abstracted from the specific RTOS. It's up to the developer (or the hardware vendor) to choose the real operating system, and adapt it to CMSIS-RTOS API. ST has developed its abstraction layer on the top of FreeRTOS. This wrapper is named CMSIS-OS. The role of CMSIS-OS wrapper is clearly described inside the UM1722 application note from ST.
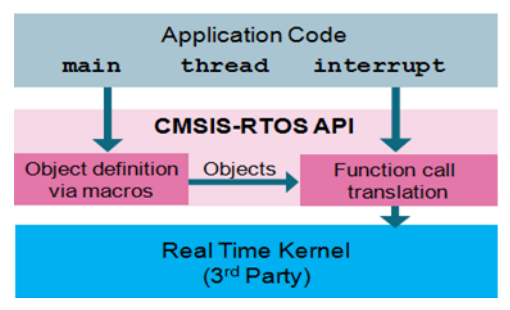
The idea under this is that using CMSIS-OS it's possible to change the RTOS at your need, without restructuring your project. I think that for simple tasks this can be true. However, when the project evolves it's usually really complex to abstract from RTOS services and peculiarities. However, to simplify this tutorial, we'll use the CMSIS-OS abstraction provided by ST, following these steps:
- go inside the STM32Toolchain/STM32Cube_FW_F4/Middlewares/Third_Party/FreeRTOS/Source/CMSIS_RTOS folder and drag the cmsis_os.c file inside the Eclipse folder /system/src/FreeRTOS;
- in the same way, copy the cmsis_os.h file inside the Eclipse folder /system/include/FreeRTOS.
We have completed the configuration procedure, and we can compile the whole project. If all went ok, you should obtain the binary files to upload on your Nucleo.
Step four: customize the project
Now that we have a fully working project able to run FreeRTOS on our Nucleo, we can customize it a bit to do something more interesting. The idea is really simple. We'll develop an app with two working tasks: one of this waits until the user presses the blue button on the Nucleo; when this happens, it wakes up the other task locked on a semaphore; this task will start blinking the green LED forever. This example will give us the opportunity to see two of the main constructs implemented in a RTOS: tasks and semaphores.
In the RTOS world, a task is nothing more than a function running in a separated stack. CubeMX already generated for us a simple task in the main, which is created using the void StartDefaultTask(void const *argument) function. We'll modify this function to wake up the other task when the user presses the blue button on the Nucleo. The other task will be represented by the void BlinkTask(void const *argument) function.
So, let's modify main() function in this way:
|
65 66 67 68 69 70 71 72 73 74 75 76 77 78 79 80 81 82 83 84 85 86 87 88 89 90 91 92 93 |
int main(void) { /* Reset of all peripherals, Initializes the Flash interface and the Systick. */ HAL_Init(); /* Configure the system clock */ SystemClock_Config(); /* Initialize all configured peripherals */ MX_GPIO_Init(); /* Create the threads and semaphore */ osThreadDef(defaultTask, StartDefaultTask, osPriorityNormal, 0, 128); defaultTaskHandle = osThreadCreate(osThread(defaultTask), NULL); osThreadDef(blinkTask, BlinkTask, osPriorityNormal, 0, 128); blinkTaskHandle = osThreadCreate(osThread(blinkTask), NULL); osSemaphoreDef(sem); semHandle = osSemaphoreCreate(osSemaphore(sem), 1); osSemaphoreWait(semHandle, osWaitForever); /* Start scheduler */ osKernelStart(); /* We should never get here as control is now taken by the scheduler */ /* Infinite loop */ while (1); } |
In lines 77-80 we define and instantiate the two threads, one associated to StartDefaultTask() function and one to BlinkTask() function. osThreadDef() is a macro that creates a definition structure for our task. A task is defined by anassociated function, a priority type and a stack size. In a similar way, in lines 81-82 we create a binary semaphore (a binary semaphore is a synchronization construct that can have only two states: available and not available). In line 83 we acquire the semaphore (that is, the semaphore becomes not available for other tasks): in this way all other tasks waiting on that semaphore will be locked until it is released by another task. In our example project this semaphore is used to synchronize the thread blinkTask(). Let's now see the StartDefaultTask() function:
|
179 180 181 182 183 184 185 186 187 |
void StartDefaultTask(void const *argument) { while(1) { if(!HAL_GPIO_ReadPin(GPIOC, GPIO_PIN_13)) { osSemaphoreRelease(semHandle); osThreadTerminate(NULL); } } } |
The task job is really simple: it waits until the user presses the blue button on the Nucleo. When this happens, it releases the semaphore and terminate.
Finally, let's the BlinkTask() function:
|
189 190 191 192 193 194 195 196 197 |
void BlinkTask(void const *argument) { if(osSemaphoreWait(semHandle, osWaitForever) == osOK) { while(1) { HAL_GPIO_TogglePin(GPIOA, GPIO_PIN_5); osDelay(500); } } } |
Even in this case the function is really straightforward. The task is locked on the semaphore, which was acquired in the main function at line 83. When the semaphore is released by the StartDefaultTask() task (because user has pressed the button), it enters in a infinite loop, toggling the LD2 led each 500ms.
You can see the whole main file on my github repository, but despite some routines related to hardware initialization, the application code is fundamentally defined in these three blocks.
FreeRTOS provides many other functionalities. I suggest you to take a look to its API documentation. Take in mind that the CMSIS-RTOS API covers only a minimal subset of the whole FreeRTOS API. For more information on CMSIS-RTOS API take a look here.
41 comments
If we chose not to use the CMSIS-OS abstraction from ST, is there any other step required to directly use the freertos code in our project? And for stm32f411xx series, do we just need to configure the correct macro in the first step?
No, you can simply use FreeRTOS API importing right header files.
However, I suggest you to use this tool I've made to automatically import projects generated with CubeMX with FreeRTOS middleware:
https://github.com/cnoviello/CubeMXImporter
Thanks, I will get started on FreeRTOS now. One more thing, are there any specific demo projects based on STM32 for freeRTOS or will the example projects from the freertos site suffice?
In the CubeHAL for the STM32 family you are considering, you should find a simple example named FreeRTOS_ThreadCreation. It's really bare-bone, but it should be sufficient to get started with FreeRTOS.
HelP run Free Rtos On stm32f107
Hi dear
i want to install and run free rtos by KeiL on stm32f107, then first i m going to connected 60 sensor to GPio,well how can i implement this?
Hi im getting TIM6_DAC_IRQn and TIM6 undeclared, what did i do wrong?
Probably because you are using an STM32 without the TIM6 peripheral. I'm almost sure that the problem comes from the vector file vectors_stm32f4xx.c. Remove it and use the vector file provided by ST in the CubeMX project folder.
I ended up downloading stm_nucleof4-freertos and it build correctly, but how do i actually run it?
The demo is designed to run on a Nucleo-F401. You have to upload it on the board by using STLink Utility tool or OpenOCD. If you are new to the STM32 programming, I suggest to have a look to this topic:
http://www.carminenoviello.com/2014/12/28/setting-gcceclipse-toolchain-stm32nucleo-part-1/
Hi,
Check you stm32fxx_msp. c file (or something like this). Timer macros shoukd be enabled, in case you did not do it during cconfiguration by cube.
Thabks
Hello, and thank you for sharing all of your STM32 work.
I followed your steps to using FreeRTOS, but I have several link errors like "undefined ...'HAL_TIM_Base_Init'" and "undefined ... 'HAL_TIM_Base_Start_IT'". Are these related to STM32Cube warning me about not using Sys Tick for the FreeRTOS timer? I ignored that warning since your instructions did not mention it. I ran STM32Cube for an F4 Discovery board.
Thanks
Artz
Have you answered "Yes" to that warning box, or have you enabled another timer as Timebase generator in the SYS entry in CubeMX?
It seems that your code is using a timer somewhere, but the HAL file related to timers management (stm32XXXX_hal_tim.{c,h}) are not in the search path of GCC.
Hello, good job sharing and great your manual "mastering-stm32" 😉
In relation to the problem mentioned by Art, it's best to answer Yes to the use of SysTick or is it better to choose a timer as Timebase Source?
Giovanni
Well, the answer is "it depends", as usual 🙂
The short story is that it's better to use another timer as timebase generator for the HAL, leaving the SysTick timer to FreeRTOS.
The full story is that it depends if you plan to use the HAL_Delay() from ISR routines. This because, by default, FreeRTOS lowers the SysTick IRQ priority to the lowest one, while instead the HAL assume that it runs at the highest one. If you call the HAL_Delay() from an ISR, it will lock your code indefinitely, since the HAL_IncTick() is never called because the low priority of the SysTick IRQ causes that it's no longer able to preempt other ISRs. The HAL_Delay() is extensively used inside the HAL, so you may accidentally use the HAL_Delay() by simply using one of the HAL__IRQHandler().
The next release of my book will have a chapter dedicated to FreeRTOS, where this topic is better explained.
Thanks for the quick reply.
The explanation is clear, given that I will use HAL_Delay then use TIM1 as Timebase Source.
I saw that STM32CubeMX v. 4.14.0 (I do not remember if there was in previous versions), makes it possible to declare the parameters for Task & queue and Timers & Semaphores in Configuration-> Middelwares-> FreeRTOS.
The generated code in main.c contains the creation of the semaphore, and the definition and creation of the declared threads.
Easy and convenient !
Yes, the support to FreeRTOS is dramatically improved in the latest CubeMX.
I saw you added one more chapter to your book. Nice job.
Guys buy his book, while it may not be as dense as programmers with some experience may like, it is still very well written and you can still find some pearl of hidden knowledge.
For novice willing to take up the ninja path, it is perfect even if I'm waiting even more chapters.
By coincidence FreeRTOS 9.0 is out, you published one more chapter of your book and my alternative tool to import CubeMX project added nearly full support to FreeRTOS.
One of the design goal of my little monster was to be able to swap in and out libraries, so without waiting ST to update to 9.0 I can already convert my projects to the newer FreeRTOS.
Everything is far from elegant and since now most of the things work I may:
- just use it
- plan a major refactor to support other libraries and make things less messy
here it is https://github.com/Ivan-SB/lib2eclipse
I'll commit a couple of new feature shortly but I already find it pretty useful.
BTW you may also find interesting this other little monster that helps to program gpio pin in one go in spite of relaying on HAL for loop.
This one is awful too but I didn't want to write a C/C++ parser, so yeah somehow it is a bit of a pain, but still useful at least for me:
https://github.com/Ivan-SB/gpio-cfg
ah BTW there is an update to CubeMX and to HAL for F1 as well.
Can I run FreeRTOS+IO on STM32Cube? If so, would you please provide me some details on how to port FreeRTOS+IO to STM32Cube project?
Thanks
Very Thanks for the awesome tutorial..I could do all steps till customizing the project, compile it. But I'm unable to load the code to STM32401RE board using ST-LINK utility. It gives an error "No elf loader found for this operation"
Have you set the FLASH memory origin address to 0x08000000 in mem.ld file?
sorry & Thanks ..I've given it 0x80000000 instead of 0x08000000 by mistake..I overlooked it..But can you explain this
I'll try. The story is a little bit complex.
FLASH memory is mapped in ALL STM32 microcontrollers starting from the address 0x08000000. The beginning of the FLASH starts there. When the ST-LINK utility identifies inside the ELF file (the binary file) a section starting from that address, it uses a dedicated loader to load the file content inside the flash. This because the flash controller of each STM32 family is different from the others.
Since you wrongly set the address to 0x80000000, ST-LINK doesn't know which loader to use.
Well, this is the short story. The long would require a very long blog post 😉
Thanks a lot..understood..I've an other thing to ask & starting a new thread below..
Now I'm done with flashing the code to STM32401RE board through ST-LINK utility. But I want to debug the code ..as per my understanding I've to follow "Setting up a GCC/Eclipse toolchain for STM32Nucleo – Part II" series..The problem I'm facing is I couldn't Install OpenOCD from the link you've provided. But managed it from other source the version 'openocd-0.9.0'. As per you I've to go to "C:\STM32Toolchain\openocd\bin" directory and rename the file openocd-0.8.0.exe in openocd.exe. (of course in my case it should be 0.9)..Here is the actual issue I'm facing..I couldn't at least able to see 'bin' directory..and even '.exe' file.
So pls help me in this regards..
Instructions in that blog post are no longer update. I need a bit of free time to upgrade them. Are you using Windows?
Yes I'm using windows..First I request you to provide me a solution for this..
but I'm really interested in working with 'vi' editor for the same as you specified in your post..I don't know how to proceed with it..also kindly please please & please help me in the form of a post on this too..Below are your words in your post on this..
"Eclipse is not strictly required to start programming with the Nucleo board. GCC and few other tools are sufficient to compile and flash your MCU. If you are among those who like to code using just Vim editor (like myself), I'll write about this topic in a next post."
Follow the installation instructions contained here:
http://samples.leanpub.com/mastering-stm32-sample.pdf
They are updated and should work out of the box.
Regarding the development of STM32 applications without Eclipse, have a look here:
https://github.com/baoshi/CubeMX2Makefile
http://www.ba0sh1.com/2013/05/25/opensource-stm32-development/
Not a thing for novices, IMHO.
Thanks for the reply & informative links..will perform it and get back to u if any issues..
'Regarding the development of STM32 applications without Eclipse'
the link is talking abt windows based..but i'm looking for vi editor in Linux platform..pls send any detailed references as your posts..
Lastly what is "Not a thing for novices, IMHO." I didn't get it..
understood what u meant by "Not a thing for novices, IMHO." Googled it..Thanks for your advice 🙂 but I'm trying to learn that way..
Thanks for the great work, including all you blogs and your book.
My issue is that when I turn on the hard floating point option, the linker gives me a bunch of errors. I believe this is because I am trying to link with gcc libraries that were built with soft fp option. I am using GCC
That was gcc_arm_none_eabi-5_2-2015q4-20151219
Hi, have you performed a complete clean of the project?
yes
And if I go to soft fp, the errors go away.
I don't think your issue is related to newlib library (gcc runtime for embedded systems). However, just in case, post the output of the following command:
./arm-none-eabi-gcc -print-multi-lib
It worked today, not sure what I did different
rkadrmas@BBB-EP35-DS3L:~/STM32Toolchain$ cd gcc-arm/bin
rkadrmas@BBB-EP35-DS3L:~/STM32Toolchain/gcc-arm/bin$ ./arm-none-eabi-gcc print-multi-lib
arm-none-eabi-gcc: error: print-multi-lib: No such file or directory
arm-none-eabi-gcc: fatal error: no input files
compilation terminated.
sorry for wasting your time!
I was all prepared to rebuild the libraries.
When exactly is the v9.0.0 going to come out?
I hear we will be able to actually make so called "safety-critical" software with such a setup.
And an M7. Why? Because I read something in a datasheet about M7 being more easy to do.
According to ST's guys, FreeRTOS 9.x will be released with the CubeMX update in January. However, FreeRTOS 9 is designed to be a drop-in replacement for FreeRTOS 8.x, since it doesn't change the actual API.
FreeRTOS doesn't introduced anything "magic" regarding safe-critical applications. It just allows to use a full-static allocation model (the 8.x release uses a hybrid allocation model, which is not totally static). This allows to use it for safe-critical applications, where rigorous standards demand full-static allocation.
Please take note that designing safe-critical apps is not for singole individuals. It requires quite large organizations, with a lot of budget and specialized employees that can affords all the complex qualification steps demanded by really complex certifications. It's not a thing someone can learn on a book, or reading things on the Internet. Electronics has became a complex field, where pieces of paper rule the design: to design a PCB is nowadays really simple, if compared to the steps and investments needed to qualify and certify a product. I'm currently involved in a certification of a BLE product: a really simple product! It will cost for our company something close to $40K, and it will require about six months of work for 3-4 people. To simply achieve a piece of paper that allows us to sell a bluetooth device. Imagine the money needed to certify a product in safe-critical fields 😉
What a pain, I honestly expected this tho, I think they make it too complicated for nothing and people hide their knowledge when it comes to this. I wanna make a machine that positions and measures parts in a cnc machines.
I 'll use it in my own machine shop, I dont care about satery critical anymore.
But still, any tips on where is the bets info to make such a system?
A sort of bubble diagram/strategy about the watchdog, bootloader.
Hi Carmine,
Greaet post! I am quite new to getting toolchains to build so I don't know if i've missed something obvious but I've followed your instructions three times now and I keep getting the same errors.
I am trying to build it for a Nucleo144 with the STM32F429ZIT6 MCU on a unix machine. I set the macro to STM32F429xx. I also used FreeRTOS 9.0 but as you mentioned in one of your comments it is a direct drop in for FreeRTOS 8.x.
I googled around for my errors but did not find anything so I am hoping you may be able to help.
The errors are the following:
Description Resource Path Location Type
make: *** [system/src/stm32f4xx/stm32f4xx_hal_timebase_rtc_alarm_template.o] Error 1 stm32-nucleof4-freertos C/C++ Problem
'RTC_FLAG_ALRAF' undeclared (first use in this function) stm32f4xx_hal_timebase_rtc_alarm_template.c /stm32-nucleof4-freertos/system/src/stm32f4xx line 178 C/C++ Problem
'RTC_FLAG_ALRAWF' undeclared (first use in this function) stm32f4xx_hal_timebase_rtc_alarm_template.c /stm32-nucleof4-freertos/system/src/stm32f4xx line 182 C/C++ Problem
'RTC_HOURFORMAT_24' undeclared (first use in this function) stm32f4xx_hal_timebase_rtc_alarm_template.c /stm32-nucleof4-freertos/system/src/stm32f4xx line 163 C/C++ Problem
'RTC_INIT_MASK' undeclared (first use in this function) stm32f4xx_hal_timebase_rtc_alarm_template.c /stm32-nucleof4-freertos/system/src/stm32f4xx line 205 C/C++ Problem
'RTC_IT_ALRA' undeclared (first use in this function) stm32f4xx_hal_timebase_rtc_alarm_template.c /stm32-nucleof4-freertos/system/src/stm32f4xx line 195 C/C++ Problem
'RTC_IT_ALRA' undeclared (first use in this function) stm32f4xx_hal_timebase_rtc_alarm_template.c /stm32-nucleof4-freertos/system/src/stm32f4xx line 241 C/C++ Problem
'RTC_IT_ALRA' undeclared (first use in this function) stm32f4xx_hal_timebase_rtc_alarm_template.c /stm32-nucleof4-freertos/system/src/stm32f4xx line 256 C/C++ Problem
'RTC_OUTPUT_DISABLE' undeclared (first use in this function) stm32f4xx_hal_timebase_rtc_alarm_template.c /stm32-nucleof4-freertos/system/src/stm32f4xx line 166 C/C++ Problem
'RTC_OUTPUT_POLARITY_HIGH' undeclared (first use in this function) stm32f4xx_hal_timebase_rtc_alarm_template.c /stm32-nucleof4-freertos/system/src/stm32f4xx line 167 C/C++ Problem
'RTC_OUTPUT_TYPE_OPENDRAIN' undeclared (first use in this function) stm32f4xx_hal_timebase_rtc_alarm_template.c /stm32-nucleof4-freertos/system/src/stm32f4xx line 168 C/C++ Problem
request for member 'Init' in something not a structure or union stm32f4xx_hal_timebase_rtc_alarm_template.c /stm32-nucleof4-freertos/system/src/stm32f4xx line 163 C/C++ Problem
request for member 'Init' in something not a structure or union stm32f4xx_hal_timebase_rtc_alarm_template.c /stm32-nucleof4-freertos/system/src/stm32f4xx line 164 C/C++ Problem
request for member 'Init' in something not a structure or union stm32f4xx_hal_timebase_rtc_alarm_template.c /stm32-nucleof4-freertos/system/src/stm32f4xx line 165 C/C++ Problem
request for member 'Init' in something not a structure or union stm32f4xx_hal_timebase_rtc_alarm_template.c /stm32-nucleof4-freertos/system/src/stm32f4xx line 166 C/C++ Problem
request for member 'Init' in something not a structure or union stm32f4xx_hal_timebase_rtc_alarm_template.c /stm32-nucleof4-freertos/system/src/stm32f4xx line 167 C/C++ Problem
request for member 'Init' in something not a structure or union stm32f4xx_hal_timebase_rtc_alarm_template.c /stm32-nucleof4-freertos/system/src/stm32f4xx line 168 C/C++ Problem
request for member 'Instance' in something not a structure or union stm32f4xx_hal_timebase_rtc_alarm_template.c /stm32-nucleof4-freertos/system/src/stm32f4xx line 162 C/C++ Problem
request for member 'Instance' in something not a structure or union stm32f4xx_hal_timebase_rtc_alarm_template.c /stm32-nucleof4-freertos/system/src/stm32f4xx line 190 C/C++ Problem
request for member 'Instance' in something not a structure or union stm32f4xx_hal_timebase_rtc_alarm_template.c /stm32-nucleof4-freertos/system/src/stm32f4xx line 202 C/C++ Problem
request for member 'Instance' in something not a structure or union stm32f4xx_hal_timebase_rtc_alarm_template.c /stm32-nucleof4-freertos/system/src/stm32f4xx line 205 C/C++ Problem
request for member 'Instance' in something not a structure or union stm32f4xx_hal_timebase_rtc_alarm_template.c /stm32-nucleof4-freertos/system/src/stm32f4xx line 207 C/C++ Problem
request for member 'Instance' in something not a structure or union stm32f4xx_hal_timebase_rtc_alarm_template.c /stm32-nucleof4-freertos/system/src/stm32f4xx line 215 C/C++ Problem
request for member 'Instance' in something not a structure or union stm32f4xx_hal_timebase_rtc_alarm_template.c /stm32-nucleof4-freertos/system/src/stm32f4xx line 216 C/C++ Problem
request for member 'Instance' in something not a structure or union stm32f4xx_hal_timebase_rtc_alarm_template.c /stm32-nucleof4-freertos/system/src/stm32f4xx line 218 C/C++ Problem
unknown type name 'RTC_HandleTypeDef' stm32f4xx_hal_timebase_rtc_alarm_template.c /stm32-nucleof4-freertos/system/src/stm32f4xx line 99 C/C++ Problem
unknown type name 'RTC_HandleTypeDef' stm32f4xx_hal_timebase_rtc_alarm_template.c /stm32-nucleof4-freertos/system/src/stm32f4xx line 269 C/C++ Problem
recipe for target 'system/src/stm32f4xx/stm32f4xx_hal_timebase_rtc_alarm_template.o' failed subdir.mk /stm32-nucleof4-freertos/Debug/system/src/stm32f4xx line 279 C/C++ Problem
Cheers
I was able to get it to build by enabling the RTC and TIM1 in cubeMX. Yet to see if the built project works on the board.
Hey,
Thanks for the tutorial. Followed all the steps and got "#error Please select first the target STM32F4xx device used in your application (in stm32f4xx.h file)" error. Appreciate any help. Thanks