
[box type="info" align="alignright" class="" width=""]Please, read carefully.
Thanks to the feedbacks I have received, I reached to the conclusion that it's really hard to cover a topic like this one in the room of a blog post. So, I started writing a book about the STM32 platform. In the free book sample you can find the whole complete procedure better explained. You can download it from here.[/box]
I recently got in my hands a new development board from STMicroelectronics: STM32Nucleo. It's a development board based on the STM32 MCU and it is compatible with the Arduino UNO pinout. This means that it's possible to use the hundreds of shields available for the Arduino. However this is true in theory, since the most important aspect of Arduino's world is the software (based on libraries, examples, and so on) made for this popular platform.
There are a lot of tutorials and guides around about how to start programming with the STM32 platform. ST provides an official framework, called STM32Cube, born to speed up the development process on this platform. STM32 is a really powerful yet complex platform, and the learning curve of this microcontroller can be really high compared to a simpler platform like the Atmel AVR (Arduino is nothing more than a huge boilerplate of code around AVR family). However STM32Cube is not sufficient to start developing with your Nucleo board. You also need an IDE (not strictly needed, but really useful) and a compiler suite. ST provides official support (with documentation and examples) only for commercial IDE like IAR. And this is a great problem if you want simply to experiment with a low-cost platform like Nucleo (it costs less than €15). The good news is that you don't need a 5.000 dollars IDE: Eclipse and GCC is all you need (plus some other tools that we'll see in the next parts of this series). The bad one is the it's not simple or fast to setup-up a working tool-chain.
I spent more than two weekends to setup a working environment to code, compile, flash and debug applications on my STM32Nucleo board, doing several errors before obtaining a fully working environment. In this series, made of three parts, I want to share how to setup a tool-chain for STM32 platform. At the end of this first post we'll be able to compile an example program for the Nucleo (a simple blinking LED - the "hello world" in electronics) and to upload it on our board using ST-Link Utility from ST. I'll not show you too many details at once (but I assume that you know C language and fundamentals of MCU programming). To setup the tool-chain we'll use these two fundamental tools:
- Eclipse: it's a popular free and OpenSource IDE, widely used in the Java world, but also available for C/C++ programming. We'll use the latest stable version: 4.4 (called Luna).
- GCC for ARM-Cortex: STM32 is a family of microcontrollers with an ARM-Cortex core (M0, M3, M4, etc). This means that we can use one of the best compiler (or, probably, the best) available for free. We'll use the cross-compiler version for ARM-Cortex platform.
The minimum system and hardware requirements of this series are:
- Windows XP SP3 32bit (the whole series is based on XP, but I think that Vista and 7 are also fine - for a 64bit platform, choose the corresponding package).
- An STM32Nucelo development board (the specific model is not relevant) - I'll base the examples on my board, STM32Nucleo-F401RE.
- Java 7 update 71 or later - please, ensure you have the latest Java 7 version before you start installing other software (you can download it from this page); don't say I didn't warn you.
[box type="warning" align="aligncenter" ]Warning: I strongly suggest you to use a virtual machine to do all experiments. I advise against using a development/production PC you use for work. VirtualBox is a free virtualization software you can use to do experiments with STM32 platform. When you'll be confident with the whole tool-chain, you can simply move it to the real PC without any risk.[/box]
Install Eclipse Luna
The first step is to install Eclipse. Actually, Eclipse is not strictly required to start programming with the Nucleo board. GCC and few other tools are sufficient to compile and flash your MCU. If you are among those who like to code using just Vim editor (like myself), I'll write about this topic in a next post. In this series I'll try to keep low the learning curve and so I assume the use of Eclipse IDE. This tutorial is based on the latest version of Eclipse, called Luna (4.4 release). You can download the "Eclipse IDE for C/C++ Developers" release from this page. This release is especially designed to develop application with C/C++ programming language.

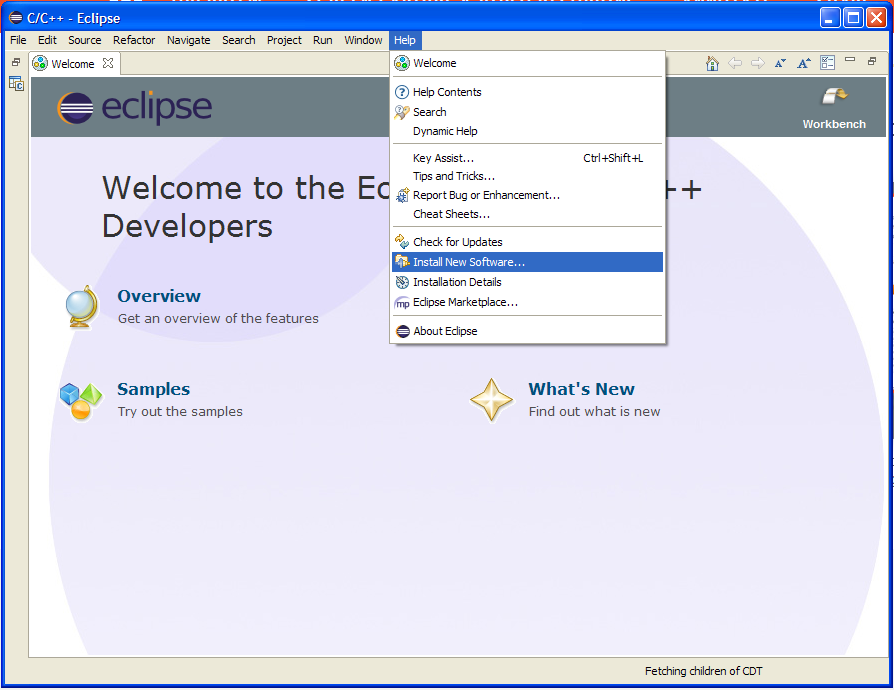
The downloaded file is just a ZIP archive. You can expand it in the C:\STM32Toolchain folder (N.B.: that path is not mandatory, but I'll assume that you install the whole tool-chain in that location during these tutorials. If you decide to install the tool-chain elsewhere, please adapt my instructions consequently). When finished, you can launch the C:\STM32Toolchain\eclipse\eclipse.exe executable. The first time Eclipse starts, it will ask your for the default projects folder. I suggest to use the path C:\STM32Toolchain\projects. When the IDE is started, go to Help->Install New Software.... [lightbox full="http://www.carminenoviello.com/wp-content/uploads/2014/12/Schermata-2014-12-20-alle-17.28.28.png"]
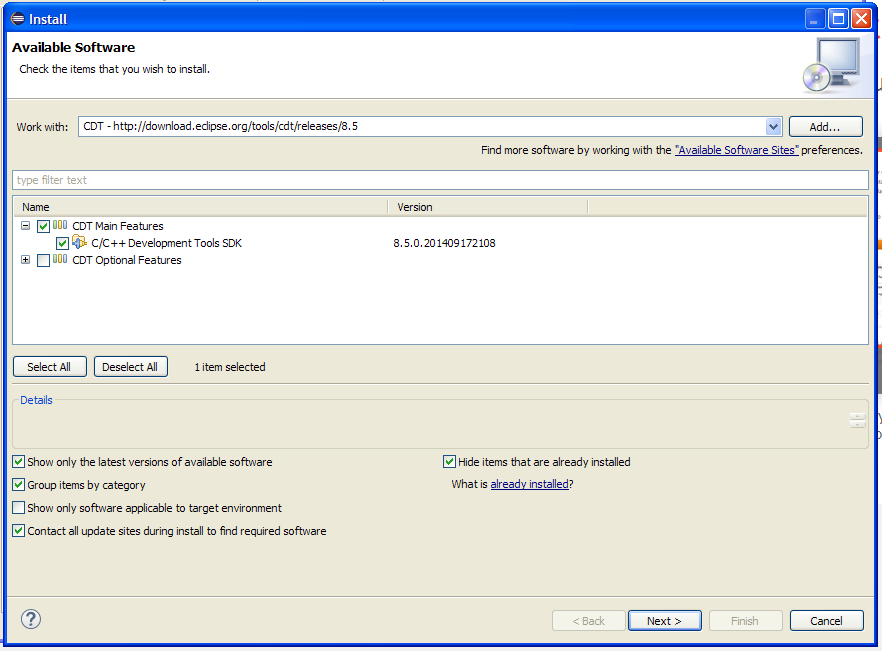
[/lightbox] Next, select the C/C++ Development Tools repository and check only the entry "CDT Main Feature", as shown in the following picture.[lightbox full="http://www.carminenoviello.com/wp-content/uploads/2014/12/Schermata-2014-12-20-alle-17.34.29.png"]
 [/lightbox]
Now, click on "Next" and follow the instructions. The installation requires some time to finish. At the end, restart the IDE as requested.
Install the GNU ARM plug-ins for Eclipse
Now we have to install the GCC ARM plug-ins for Eclipse. These plug-ins add a rich sets of features to Eclipse CDT to interface GCC ARM tool-chain. Moreover, they provide specific functionalities for the STM32 platform. Plug-ins are developed and maintained by Liviu Ionescu, who did a really excellent work in providing support for the GCC ARM tool-chain. Without these plug-ins it's almost impossible to develop and run code with Eclipse for the STM32 platform. To install GCC ARM plug-ins go to Help->Install New Software... and click on the "Add..." button. Fill the text fields in the following way:
- Name: GNU ARM Eclipse Plug-ins
- Location: http://gnuarmeclipse.sourceforge.net/updates
and click the "OK" button. After a while, the complete list of available plug-ins will be shown. Select plug-ins to install as in the following picture:
[lightbox full="http://www.carminenoviello.com/wp-content/uploads/2014/12/Schermata-2014-12-20-alle-17.44.45.png"]  [/lightbox]
Then, click on "Next" and follow the instructions. Restart the IDE when requested.
Install the GCC ARM tool-chain
The next step is to install the GCC tool-chain for the ARM Cortex platform. You can download a prebuild version for your operating system from this web site. I successfully tested the 4.8-2014-q3-update release. You can download the installer and start the installation. When asked, install the tool-chain in the following directory C:\STM32Toolchain\gnu-arm\4.8-2014q3 (as I said before, you can choose the path you want, but I'll assume this path in the next steps). IMPORTANT: I strongly suggest to leave unchecked the entry "Add path to environment variable", especially if you have other compilers or IDE installed on your PC (for example, if you use MinGW or similar package manager for Windows). Now go on with the next step.
Install the Build Tools
Windows historically lacks of some tools that are a must in the UNIX world. One of these is make, the tool made by Richard Stallman that controls the compilation process of programs written in C/C++. If you have already installed a product like MinGW or similar, you can skip this process. If not, you can install the Build Tools package made by the same author of GCC ARM plug-ins for Eclipse. You can download setup program from here. When asked, install the tools in these folder: C:\STM32Toolchain\Build Tools. Restart Eclipse.
Install the ST Link drivers for STM32Nucleo board
This is a really important step. Pay attention to the next instructions. Before installing any other piece of software, it's convenient to install the drivers for the STM32Nucleo board.
[box type="warning" align="aligncenter" ]Important: before install drivers, disconnect the board from the USB port![/box]
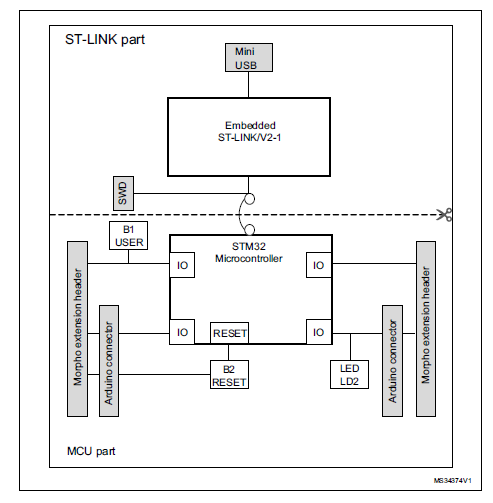
One of the key feature of Nucleo board is that it already provides the on-chip programmer for STM32 MCUs: the ST-Link. In fact, Nucleo boards are made of two parts: the ST-Link programmer (the one with USB connector) and the target board (the one with Arduino-style expansion headers).
It's important to highlight that different from the commercial ST-Link programmer, the Nucleo board provides a more recent version of ST-Link: the 2.1 version. This means that you have to update your drivers even if you already have an ST-Link programmer. You can download the latest drivers from here. Install the drivers and check that everything works correctly. When you connect your board to the PC, you should see two new peripherals: the ST-Link programmer and a Virtual Com Port. If everything works correctly, you can go to the next step. [box type="warning" align="aligncenter" ]Important: some Nucleo boards (like the mine) need a firmware update of the ST-Link part. After installed the drivers, you can download the firmware update from here and follow the instructions. This step is really important![/box]
Install STM32CubeMX and ST-Link Utility
When a STM32 MCU starts, it needs an hardware configuration to work correctly. This configuration is dependent of the specific MCU and the chosen hardware configuration. This configuration must be performed when the CPU boots-up. Unfortunately, this is not a trivial task and it requires a deep knowledge of the specific MCU. However, we have a more short way to do this work. ST provides a dedicated tool that generates the initialization code for us. This tool is called STM32CubeMX and it will come really useful in the next part of this tutorial. So you can start to download it from here (you'll find the download link at the bottom of page). Install it following the suggested configuration.
To simplify this part of the tutorial we won't use any debugging tool inside the Eclipse IDE, but we'll use the official ST-Link Utility tool to flash our Nucleo boards. You can download this tool from here. Install it following the suggested configuration. [box type="warning" align="aligncenter" ]Important: install the ST-Link Utility only after you have already installed Nucleo drivers. I've installed ST-Link Utility before installing the board drivers, but I had several issues that prevented the board from working right.[/box] After the ST-Link Utility is installed, connect your Nucleo board to the PC and check if the ST-Link Utility sees the boards.
[box type="error" align="aligncenter" class="" width=""]READ CAREFULLY: If you have Nucleo-F401RE board you can continue reading this tutorial. The generated code will work without any problems. However, these instructions a not suited for other type of Nucleos. I recently wrote a more general tutorial that covers also the other Nucleo boards (F1, F0, etc). You can read it here:
http://www.carminenoviello.com/en/2015/06/04/stm32-applications-eclipse-gcc-stcube/[/box]
Create a test project
Ok. A lot of work is already done. Now we have to check that all works correctly. We'll now create a test project (a simple blinking LED application) using the Eclipse plug-ins installed before.
First, start Eclipse and go to File->New->C Project. If you have a STM32Nucleo-F4 board, you can use the next configuration options. Otherwise, you have to adapt for your Nucleo processor family. You can choose the project name you want (I chose "test1"). Click on "Next". 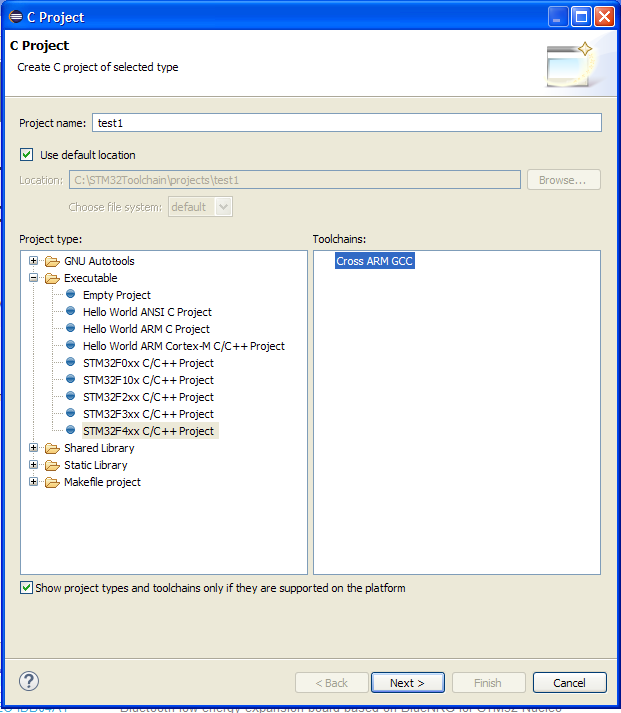
In the next step you have to setup the right chip family for your Nucleo board. For the Nucleo-F401RE board the right family is STM32F401xE. Important: pay attention to select the right chip family, otherwise the test example may not work. Setup the remaining configuration parameters like in the following picture.
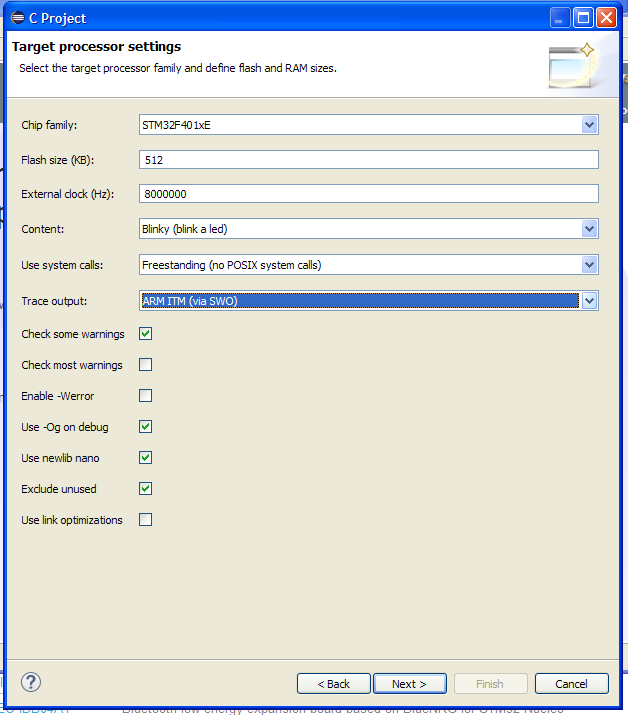
Click on "Next". You can leave the default parameters in the next steps. The final step is about the GCC tool-chain. You can use these values:
tool-chain name: GNU Tools for ARM Embedded Processors (arm-none-eabi-gcc)
tool-chain path: C:\STM32Toolchain\gnu-arm\4.8-2014q3\bin
Click "Finish".
Now, if this is the first time you get in touch with the Eclipse IDE, you could be a little bit mazed by its interface. Eclipse is a multi-window IDE, and windows can be organized in several groups called perspective, as they are called in the Eclipse gibberish. It's out from the goals of this article to explain how Eclipse works. I suggest you to play with the buttons marked in red in the following image. [lightbox full="http://www.carminenoviello.com/wp-content/uploads/2014/12/Schermata-2014-12-20-alle-22.16.28.jpg"]  [/lightbox] After some clicks, you should obtain an interface close to the one in the following image. [lightbox full="http://www.carminenoviello.com/wp-content/uploads/2014/12/Schermata-2014-12-20-alle-22.22.50.png"]
 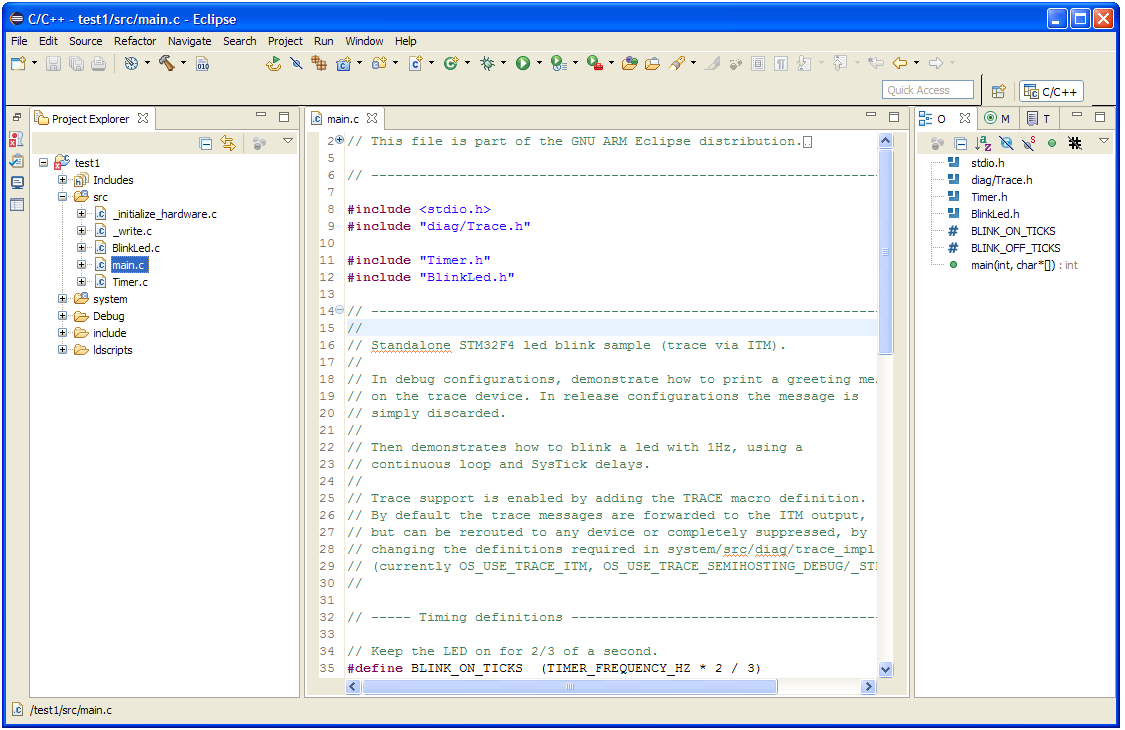 [/lightbox]
Let's compile the test project
Before we can compile the test project, we need to complete few other steps. However, let's start to become familiar with the IDE and let's try to compile the project. Go to Project->Build all. After few seconds, this error message will appear in the compiler console: 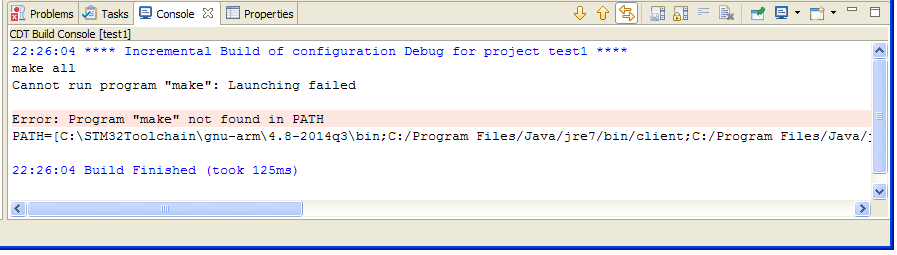 This message simply means that the IDE can't find the make.exe program, used to compile source files. If you remember, we already installed the Build Tools in the previous steps. Now we have to set the correct path to Build Tools. Go to Window->Preferences. The Eclipse preferences window will appear. Go to C/C++->Build->Environment and click Add.
 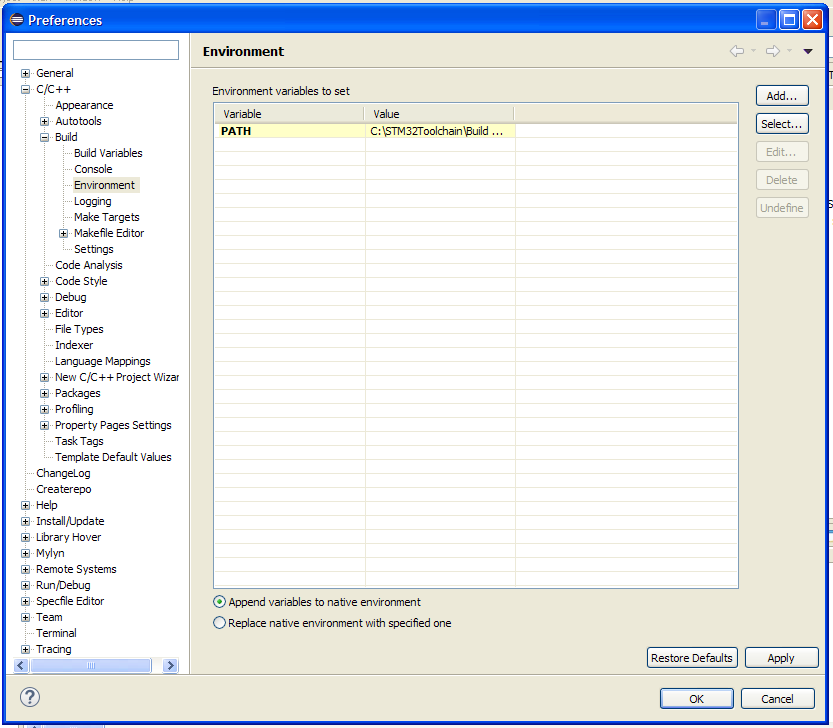 Insert the string Path in the filed "Name", and C:\STM32Toolchain\Build Tools;${Path} in the field "Value". Click first on "OK", then on "Apply" and lastly on "OK" again. Let's restart the build process going to Project->Build all. This time compilation will be longer. At the end, this message will appear on the compiler console..
  Bingo. We have successfully compiled the test project for our Nucleo board.
Flash the binary on the STM32Nucleo MCU
To upload the binary image to the Nucleo MCU we'll use the ST-Link Utility. Connect the Nucleo board to the PC. Start the ST-Link Utility and go to Target->Connect. LD1 LED (the one close to the mini-USB connector) will start blinking green/red and ST-Link Utility will show information about our Nucleo chip. Now, we simply can upload the binary image going to Target->Program & Verify.... A file selection window will show. Go to C:\STM32Toolchain\projects\test1\Debug and select test1.hex file. The following window will appear. 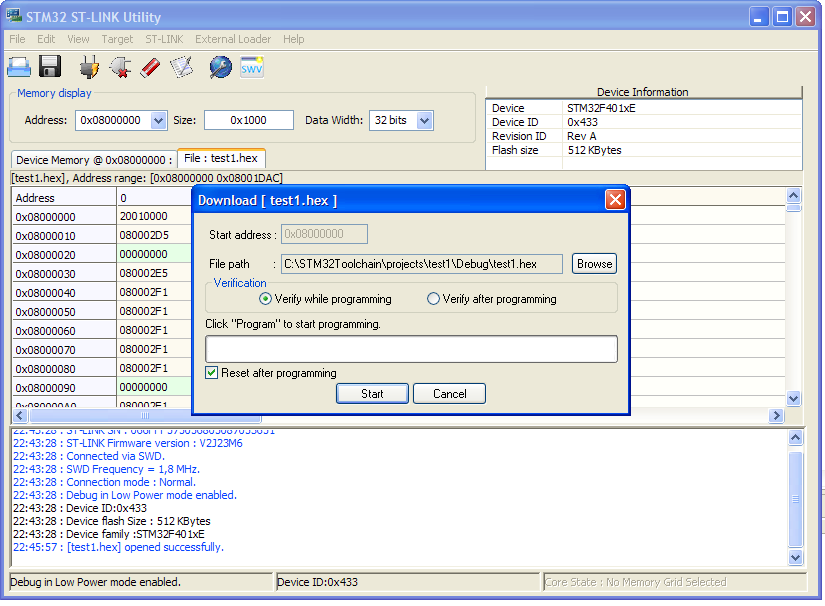 Click "Start". After few seconds the upload is finished. We successfully programmed our Nucleo board 🙂
Adapt the test code to the Nucleo board
Ok. Stop. Your board is not broken. The green LED (marked LD2 on the PCB) does not blinks because we need to do few other configuration steps. Do you remember STM32CubeMX? Now it's the right time to use it.
The template code generated by the GNU ARM plug-in for Eclipse is not designed to run on the Nucleo board, but it's designed to run on the more popular STM32 Discovery platform. So we need to adapt it to work correctly with our Nucleo board. We essentially need to modify two things: the MCU pin associated to the LED LD2 (it's mapped to a different pin on the Nucleo board) and the right oscillator configuration for our board. My Nucleo board version (STM32Nucleo-F401RE) does not provide an external oscillator, and we need to use the internal oscillator that allows our MCU to run "only" up to 84Mhz (amazing! :-)). You should check the right configuration for your Nucleo, since some of them provide an external oscillator. However, the solution I'm going to show we'll allow to setup correctly every Nucleo. STM32CubeMX will come in handy to accomplish this task.
[box type="info" ]For the sake of completeness, I've to say that ST distributes a CubeMX version as Eclipse plug-in. Unfortunately, this plug-in seems not working correctly. My Eclipse crashed and it's totally unusable unless I don't remove the CubeMX plug-in. Probably this plug-in isn't still tested with the Luna version. For this reason, I'll use the standalone version in these tutorials.[/box]
Start STM32CubeMX and go to "New Project". Click on the tab "Board Selector". In "Type of Board" choose Nucleo. In the "MCU Series" drop-down list choose your Nucleo target MCU version. Next, in the column labeled "Peripheral Selection"add "1" to rows Led and Button. In the "Board List" table, choose your exactly Nucleo version.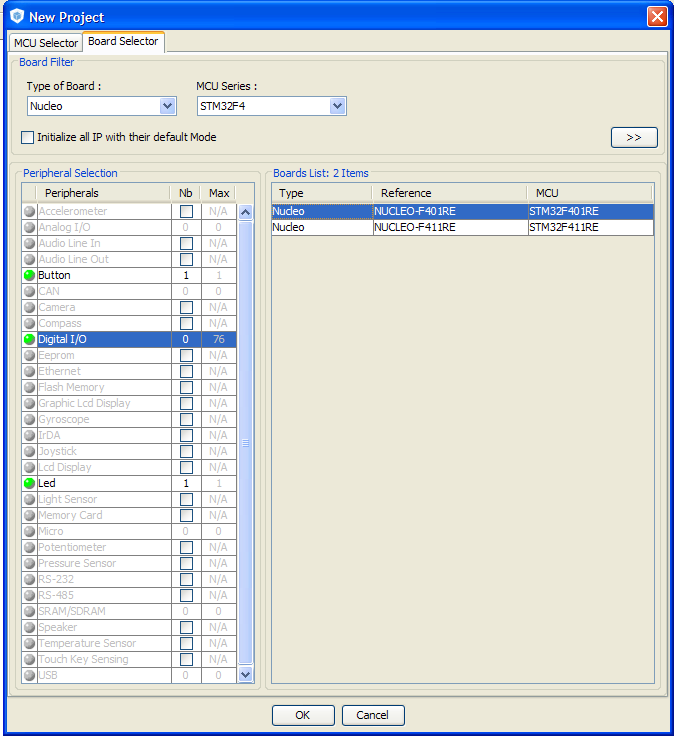 Click on "OK". CubeMX will show your target Nucleo MCU and its configuration. [lightbox full="http://www.carminenoviello.com/wp-content/uploads/2014/12/Schermata-2014-12-21-alle-07.29.47.png"]
 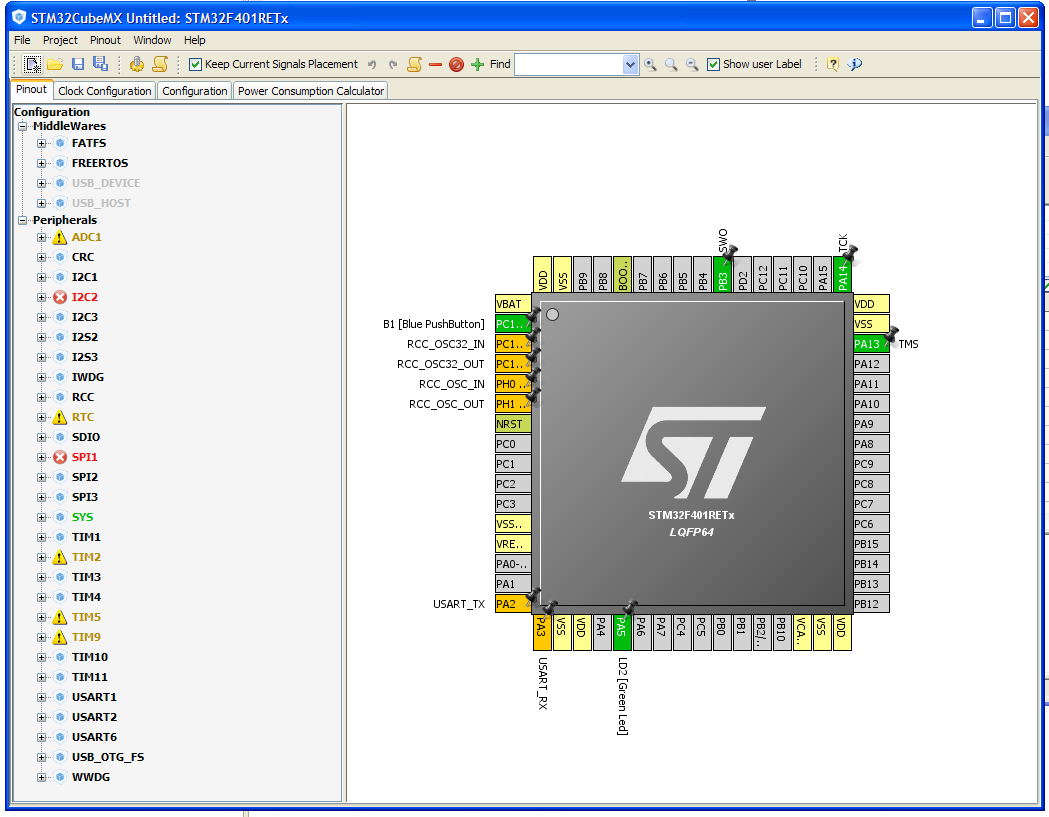 [/lightbox]
A description of the CubeMX software is out of the goals of this tutorial. I'll give a deep description of this tool in a next post. We only use it to generate the right oscillator configuration. Go to "Project->Generate Code" and fill the fields like in the following picture. 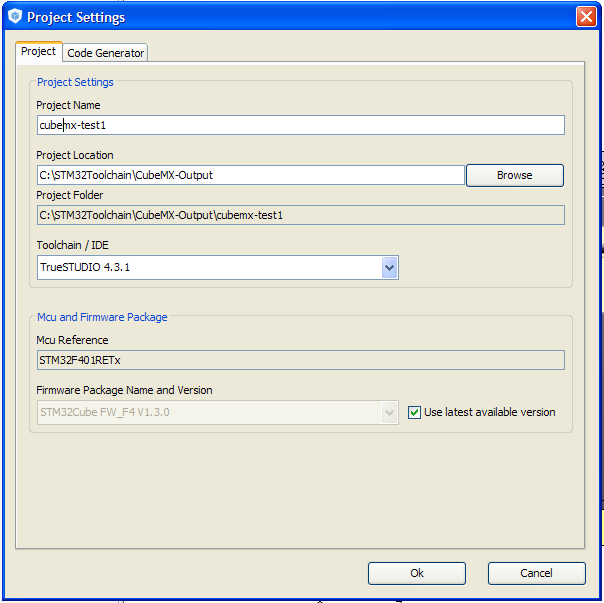 Click on "OK" button. CubeMX will ask us if we want to download the latest version of STM32Cube framework. In our case, we can choose "NO" since the GNU ARM plug-in already provides the latest framework version. Click on "Continue" in the next message box. When the generation ends, click on "Open Folder" and go inside the "src" folder. Open "main.c" file and copy the whole content of the function SystemClock_Config(void). If you have the same Nucleo board I have, the generated code will be equal to this one.
|
97 98 99 100 101 102 103 104 105 106 107 108 109 110 111 112 113 114 115 116 117 118 119 120 |
RCC_OscInitTypeDef RCC_OscInitStruct; RCC_ClkInitTypeDef RCC_ClkInitStruct; __PWR_CLK_ENABLE(); __HAL_PWR_VOLTAGESCALING_CONFIG(PWR_REGULATOR_VOLTAGE_SCALE2); RCC_OscInitStruct.OscillatorType = RCC_OSCILLATORTYPE_HSI; RCC_OscInitStruct.HSIState = RCC_HSI_ON; RCC_OscInitStruct.HSICalibrationValue = 6; RCC_OscInitStruct.PLL.PLLState = RCC_PLL_ON; RCC_OscInitStruct.PLL.PLLSource = RCC_PLLSOURCE_HSI; RCC_OscInitStruct.PLL.PLLM = 16; RCC_OscInitStruct.PLL.PLLN = 336; RCC_OscInitStruct.PLL.PLLP = RCC_PLLP_DIV4; RCC_OscInitStruct.PLL.PLLQ = 7; HAL_RCC_OscConfig(&RCC_OscInitStruct); RCC_ClkInitStruct.ClockType = RCC_CLOCKTYPE_SYSCLK|RCC_CLOCKTYPE_PCLK1; RCC_ClkInitStruct.SYSCLKSource = RCC_SYSCLKSOURCE_PLLCLK; RCC_ClkInitStruct.AHBCLKDivider = RCC_SYSCLK_DIV1; RCC_ClkInitStruct.APB1CLKDivider = RCC_HCLK_DIV2; RCC_ClkInitStruct.APB2CLKDivider = RCC_HCLK_DIV1; HAL_RCC_ClockConfig(&RCC_ClkInitStruct, FLASH_LATENCY_2); |
This code is the right configuration for the system clock of our Nucleo board. As you can see, STM32 MCUs have a non-trivial clock configuration. CubeMX dramatically simplify this step, allowing us to concentrate on the application development. Copy the generate code inside the SystemClock_Config() function. Now, go back to Eclipse and open the file _initialize_hardware.c contained in the "src" folder. Substitute the whole content of configure_system_clock(void) function with the one we have copied before. Now go to "include" folder and edit the file BlinkLed.h. Go to line 30 and modify the LED port configuration in the following way:
|
30 31 32 |
#define BLINK_PORT_NUMBER (0) #define BLINK_PIN_NUMBER (5) #define BLINK_ACTIVE_LOW (0) |
In this way we are going to use the pin A5, where the LED LD2 is connected. Save all the modified files (pay attention to save all files since Eclipse will not automatically save them) and recompile the project. Now we can flash our Nucleo again using ST-Link Utility. The LED LD2 finally blinks 🙂 [box type="warning" ]Attention: I spent 4 damned hours before I've understood that ST-Link Utility doesn't load the .hex file every time it changes. This means that you are uploading the previous version of binary file. You have to reload it manually. To do this, click with the right button on tab named "test1.hex" and choose "Open file", as shown in the following picture.  [/box]
Mission accomplished. We've successfully programmed our Nucleo board. In the next post I'll show how to configure Eclipse to flash the MCU and to do step-by-step debugging. Stay tuned!
This article is part of a series made of three posts. The second part is here, the third here.
69 comments
Awesome tutorial! I can't thank you enough, as its a perfect wrap up of everything needed to get started with an all open-source powered development toolchain on this board.
Hello Carmine,
A quite great solution for STM32 developers, I really appreciate you work.
FYI AC6 provides an eclipse based toolchain for stm32 called System Workbench For STM32 : http://www.openstm32.org/HomePage
but it need improvements like system calls settings flexibility and newlib-nano support.
BR Tarek
[…] this post I’ll show you how to use the free GCC/Eclipse toolchain we’ve setup in the past to compile BlueNRG stack and demos. I’ll show you all the required steps to successfully compile […]
Thanks a lot for the great tutorial!
thank you so much! finally a blinking led
Dear Carmine,
thanks a lot for this very good tutorial.
Instead fo the Nucleo board I use a STM32F4Discovery and observe the following thing:
After flashing the board I get a message like
"
10:34:48 : Device ID:0x413
10:34:48 : Device flash Size : 1MBytes
10:34:48 : Device family :STM32F40xx/F41xx
10:34:52 : Memory programmed in 1s and 14ms.
10:34:52 : Verification...OK
"
in the ST-Link Utility Console. What seems to be OK, but the LED does not blink. Only after disconnecting and connecting the board the LED starts flashing. I can modify the code in eclipse (change the LED pin in the BlinkLED.h " #define BLINK_PIN_NUMBER (14)" to somethimg between 12 and 15) and after flashing it is the same game. Only after a short unpugging of the board the LED (depending on the selected pin number) starts to flash. Pressing the reset button does not help. Furthermore the green/red LED continously changes colour after flashing the code.
Is the flash procedur not compleately finished?
Max
Hi Max,
What about the clock configuration? Did you arrange it according your board? I think that the clock config generated by the Eclipse plug-in should be ok for STM32F4 discovery. The one I show in the post is for the Nucleo board.
Hi Carmine,
Thank for your hint.
I found the problem. I think I installed the Drivers and ST-Link Utility in the wrong order. Now i works fine.
But I'm faced with a new problem:
After 'Generate Code' of a new project in STM32CubeMX you propose to ' ... “Open Folder” and go inside the “src” folder. Open “main.c” file ... ', but in my case:
- After 'Open Folder' nothing hapens, I even cannot close STM32CubeMX. I have to close it via the Task-Manager.
- If instead 'Close' is pressed everything is fine and the 'main.c' is newly build and can be open via the Windows Explorer.
- If instead 'Open Project' is pressed I get the message 'Please install TrueSTUDIO 4.3.1 to open the project. Or associate the file type of your project with the toolchain in your Toolchain in System Default Tollchain settings'
Is there anything I have to take care for if I install TrueSTUDIO 4.3.1 or newer?
Max
Hi Max,
The only thing that comes in mind is to check if you have the latest java version, since CubeMX is build with Java. But I haven't experiences with TrueStudio.
Hi thank you for you wonderful tutorial. I have a problem with copy and paste the clock configuration code. I cannot find _initialize_hardware.c in eclipse under "src" folder. I do have one under "system"->"src"->"cortexm". However, there is no configure_system_clock(void) function in it. Please advice, thank you!
Hi Chao,
This is really strange. Please, check that you've selected the right configurations during the project generation wizard and that you have the latest version of GNU GCC Eclipse plug-ins. It seems that something is wrong with the installation, because that file should be generated automatically.
Great tutorial! It helped me a lot, thanks
Hi Carmine,
thank you for this great tutorial.
I have the same or a very similar problem like Chao. There is no file named _initalize_hardware.c in src but in system -> src -> cortexm. I use the NUCLEO-F103RB board. Maybe this causes the different results?
Hi Sloth,
I made a test project and you are right: the _initialize_hardware.c file is not generated. The file in system->src->cortexm should not modified, because it's part of the official STM32Cube-F1 library. If you see inside that file, all functions are declared as __attribute__((weak)). This means they can be overridden in another file. However, I suggest starting add clock configuration in that file and see if the board works correctly. Unfortunately, I haven't a F-103RB board to do tests. I decided to buy one as soon as possible.
Hi Carmine,
thanks for your reply. I'm not sure if I get you right. Should I insert the code of SystemClock_Config(void) generated by stm32cubemx into the the function __initilize_hardware(void) like this:
void
__attribute__((weak))
__initialize_hardware(void)
{
}
Or should I create my own _initalize_hardware.c file like it is biuld by your board / processor?
Thanks a lot for yourefforts.
Sorry it seems like there was a little html-issue. 🙂
it meant to be read like:
void
__attribute__((weak))
__initialize_hardware(void)
{
"code of SystemClock_Config(void) generated by stm32cubemx"
}
why do i need the st link driver stuff. later for debugging i guess because the nucleo does show up like a usb drive to program it.
So i have trouble with this st-link driver stuff. i have eclipse inside a Arch VM. Soooo i gues no debugging?
Because virtualbox !=easy direct hardware access
You need ST-Link driver because the Nucleo is equipped with a ST-Link debug interface and OpenOCD need to access to it using drivers.
I think there are no problems in running above a VM (I do this and never had a problem). Please, ensure that your Nucleo ST-Link firmware is updated to the latest version
http://www.st.com/web/en/catalog/tools/PF260217
Hello, great tutorial. But I'm with a problem. The standard peripheral library of GNU ARM is different from the one given by STM32 Cube. In this way the clock code generated by the Cube is incompatible with the GNU ARM. How can I solve that? by the way, I'm using the Nucleo F103RB.
Hi Julio,
Probably you are using a more recent version of STCube-F1 then the one included by the GNU Eclipse plug-in. Have you checked if are there updates of the plug-in? What errors you receive?
Hi Carmine, thanks for answer. The STCube and the GNU Eclipse were recently installed, I think both are updated. Seems that are a lot of difference between them, for example the RCC_OscInitTypeDef structure doesn't exist in the GNU librarie. Another difference that I notice are the file names, in the GNU it is "stm32f10x_rcc.c" and in the Cube is "stm32f1xx_hal_rcc.c" for example.
I discovered that what GNU ARM Eclipse plug-in generates for STM32F1 family is TOTALLY different from the official STCube-F1 library. I'm trying to write down a post on how to compile STCube-F1 generated code with an Eclipse/GCC toolchain.
For those of you are having problems to follow my instructions on Nucleo-F1 boards, I reached to the conclusion that for STM32-F1 the author of GNU ARM Eclipse plug-in hasn't implemented yet templates for HAL drivers (those contained in STCube-F1 framework). This post explains this:
http://sourceforge.net/p/gnuarmeclipse/feature-requests/94/
So, the generated project template is for the old and unsupported Standard Peripherals Library (STD) from ST. My instructions can't work.
I'm going to write down instructions to create a complete bare-bone template for F1 boards, but I need the time and a F1 Nucleo board to do tests. Please stay tuned 😉
Ok, I published another tutorial that could lead to a fully working example for Nucleo-F1 boards. Take a look here:
http://www.carminenoviello.com/en/2015/06/04/stm32-applications-eclipse-gcc-stcube/
This is the first up-to-date tutorial about eclipse and stm32 that actually worked for me! Thank you very much for this!
In the above extract from your article should configure_system_clock not be SystemClock_Config?
Hi,
No. If you are following my tutorial, the right function name is configure_system_clock(void);
Beautifully detailed tutorial - unfortunately I followed all the steps and it isn't working for my STM32F411 :). I'll need to meditate over it during the weekend and see what's wrong.
I'm very new to ARM and 32Bit MCUs, bought my first one yesterday. My experience is more with the 8-bit AVRs and PICs.
I'd like to know what you think of using mbed.org for developing projects on this board - any problems/issues you see? It's very simple to get started using mbed. Most of the other IDEs have a limitation on 32K code size, but mbed.org doesn't seem to have that and it *appears* to be free.
I'm aware of the fact that these instructions are not complete and don't perfect match all STM32 sub-families. To address this, I've decided to writing a more deep "tutorial" in a form of book. I'll publish it soon (I've decided to start publishing the first five chapters - almost 120 pages). If you are interested in knowing when, you can subscribe it here.
Simply, I've no opinions about mbed. I'am always skeptical when it comes to these giant pieces of code, especially when dealing with the hardware. Moreover, all this stuff around IoT world is still unclear where it's going. I like to play with STM32 HAL for the moment, especially to develop "commercial" products (for hobbyists probably worth a look).
Thanks for the amazingly fast reply. I am hesitant to use mbed because it hides so much info, similar to the Arduino. I'd rather learn the basics of the microcontroller.
Subscribed! Thanks that'll be awesome, I'll look forward for the book. Thanks for sharing the knowledge.
Okay I got it to work for the Nucleo-F411RE (MCU STM32F411RET6). I made a mistake in setting the pin configurations in BlinkLed.h. There is a #IF condition for the pinouts depending on the board and I set the ones for the board which wasn't correct. So I removed the #IF #ENDIF lines and just had the definitions for the pins:
#define BLINK_PORT_NUMBER (0)
#define BLINK_PIN_NUMBER (5)
#define BLINK_ACTIVE_LOW (0)
and it started working.
A few points though -
1) The programmer LED keeps blinking in a red-green dance as long as it's connected to the ST-LINK Utility. Stops blinking if we disconnect it.
2) The function in _initialize_hardware.c for me is SystemClock_Config(void) and I just replaced the contents of this function with the STM32CubeMX output as explained in the tutorial.
Thanks once again!
Hi Carmine,
I followed your tutorial for NUCLEO-L152RE, and blinking on-board LED with GPIO example given in stm32cubel1
It worked flawlessly.
Thanks a lot for the tutorial..,
name typeo..its JATIN GANDHI.,
Are there any tutorial out there for getting started with RTOS using Nucleo platform?
Thanks again.,
What I mean is besides FreeRTOS, like ChibiOS/RT..,
Hi,
I wrote a tutorial showing FreeRTOS on a Nucleo:
http://www.carminenoviello.com/en/2015/06/22/running-freertos-stm32nucleo-free-gcceclipse-toolchain/
For ChibiOS/RT it should be more simple, since you can download Chibistudio, an Eclipse IDE already full configured to work with Nucleo boards.
hi, i am getting this error in linux when i am trying to view my st link
st-util
WARN src/stlink-usb.c: Error -3 (Permission denied) opening ST-Link/V2 device 002:009
Hi,
Please, try to run the commands (OpenOCD or st-util) with root privileges. If you have a sudoers distribution, you can run:
$ sudo openocd -f....[…] found this excellent article on setting up toolchain for a stm […]
Hello, thank you so much for your tutorial. I have juste one problem, I have a Nucleo-L476RG with a STM32L476RGT6, and when I try to start with a new project, I didn't find a kind of "STM32L4xx C/C++ project" in the suggested project.Can you please help me?
Hi,
You can find all the instructions to create a project for your board in the free sample of my book.
https://leanpub.com/mastering-stm32
Dear Carmine,
My question is about setting up the toolchain on a Macbook Pro with Mac OS X 10.11.3 (El capitan) as per your book version 0.8 (bought in Feb 23). I have tried several times to register to book's forum page but with no success. So, I have nothing to do but to write the issue here.
Basically I am unable to establish proper connection between my Mac and Nucleo board (with the latest FW version). I guess the problem may have some roots on libusb-1.0 installation (section 2.4.4, p.84). The issue surfaces by executing the openOCD test script as given in the text, p.86. OpenOCD exits with Error: read version failed.
I have tried to connect to board with stlink (texane) but ./st-info --descr command result in [!] send_recv. So this is not a openOCD issue.
A short googling revealed several similar forum entries but with no solutions, e.g., https://forum.sparkfun.com/viewtopic.php?f=18&t=42087
One specific entry for a similar but not exactly the same issue states that this is an issue in El Capitan which will be corrected by the latest OS X release, i.e., 10.11.4.
I am curious that if you have some sort of solution for this, or may be I am making something totally wrong.
Your help will be greatly appreciated.
Regards,
Mert
PS. Just a small comment. In order to build openOCD on El Capitan I have to patch openOCD as per Change 2838.
http://openocd.zylin.com/#/c/2838/
In this command, boards should be board.
$ ../src/openocd -f boards/.cfg
Dear Mert,
Thank you for reporting me issues with the registration form. Probably now I've found a definitely solution to that problem.
About your issues. Several people with latest OS X version are reporting incompatibilities with the ST-LINK interface. Unfortunately, seems there are no solutions at the moment. Moreover, I've no Mac machines with EL Capitan to conduct tests (I'm still using Mavericks).
As soon as I found a solution, I'll send you an E-Mail.
Hi Carmine,
Excellent tutorial, it leads step by step without any errors.
Thanks and respect!
Hi Carmine!
Thanks a lot for putting so much effort into your tutorial!
I ran into a problem and I hope you can help me out. When compiling the test code I get the error:
make: *** [system/src/stm32f4-hal/stm32f4xx_hal.o] Error 1 test2 C/C++ Problem
I checked the c:\STM32Toolchain\Build Tools\ folder and I found only .jar files. The download link for the make.exe did not give an install (.exe) but only the executable java files.
I hope my question makes sense. I am a total n00b with this stuff 🙂
Update:
I found make.exe here: http://gnuwin32.sourceforge.net/packages/make.htm
And installed it to C:\STM32Toolchain\Build Tools\
I changed the path to: C:\STM32Toolchain\Build Tools\GnuWin32\bin because this is the location where make.exe is after the install.
The build works correctly now! At least I don't get any errors. Just two warnings about SystemClock_Config() but I don't worry about those for now.
Great tutorial - with the right level of details.
Your notes and warnings on typical mistakes are really useful.
And at the end it works 🙂
If you are interested in topic: make money from surveys -
you should read about Bucksflooder first
Thanks for the tutorial. Great help!!
Hi Carmine,
thanks for the tutorial, I recently started reading your tutorial again to get back on the scene, I have done the following:
1) downloaded the latest eclipse Neon, will it be a problem if I use it instead of Luna?
2) I installed the GNU ARM plug ins for Eclipse, after downloading, I updated them by Help>Installation details>Update
3) I downloaded the GCC ARM tool-chain, version 4.8-2014q3 to be exact, I saw they had V6 recently, dont know if I should download that one? I added the paths correctly, my path is c:\STM32Toolchain\gnu-arm\4.8-2014q3\bin\
4) I am not using UNIX, so I downloaded the build tools but I downloaded the latest one that I offered, I dont know if this could cause some trouble? the one I downloaded was the repository version 3.1.1 found in https://sourceforge.net/projects/gnuarmeclipse/files/latest/download?source=files
5) I already have the ST-link drivers installed since I use MBED all the time, is it still fine? my nucleo F401re shows up on my COM devices
6) I installed STM32CubeMX and the ST_Link Utility although I havent gotten to use them yet
7) created a test project, used the settings exactly (I have a F401RE), I chose the blinky project. I added the correct toolchain name from the drop down list, I added the correct tool chain path as you showed in the tutorial.
8) compiled, got the make error, went to preferences and added the path you gave (C:\STM32Toolchain\Build Tools;${Path}),
even after adding the path, I got an error, I tried searching for the make.exe file, there was no file.
I suspect that the build tools step was done wrong, because I downloaded the latest version which was a repository that I copy and pasted, the link to that repository is https://sourceforge.net/projects/gnuarmeclipse/files/latest/download?source=files
I dont know if there is another version I should download. please help.
Hi,
these instructions are a little bit out-dated. Can you follow those ones in the free sample of my book?
http://samples.leanpub.com/mastering-stm32-sample.pdf
They are the most updated ones.
Carmine hey! thank you so much for the book link. how much is the full version? I followed the tutorial word for word. luckily its still relevant, there was a small thing that I had to work around though but I figured it out. I have successfully programmed my nucleo, I will read it more and learn the debug capabilities to get more info. I am currently busy with my bachelors project and hope to get more support from you if you are willing and available =D. I always enjoy reading your blog
Very good tutorial that explain clearly all the steps
Hi Carmine,
I have gotten my st-link utility to program my nucleo again, but this time when I try build a project, it does not generate the hex file I need. it worked the first time, I dont know what I did different this time. will you have a look at this error and point me in the right direction?
00:11:01 **** Incremental Build of configuration Debug for project button ****
make all
Building file: ../system/src/stm32f4-hal/stm32f4xx_hal.c
Invoking: Cross ARM C Compiler
arm-none-eabi-gcc -mcpu=cortex-m4 -mthumb -mfloat-abi=soft -Og -fmessage-length=0 -fsigned-char -ffunction-sections -fdata-sections -ffreestanding -fno-move-loop-invariants -Wall -Wextra -g3 -DDEBUG -DUSE_FULL_ASSERT -DSTM32F401xE -DUSE_HAL_DRIVER -DHSE_VALUE=8000000 -I"../include" -I"../system/include" -I"../system/include/cmsis" -I"../system/include/stm32f4-hal" -std=gnu11 -Wno-bad-function-cast -Wno-conversion -Wno-sign-conversion -Wno-unused-parameter -Wno-sign-compare -Wno-missing-prototypes -Wno-missing-declarations -MMD -MP -MF"system/src/stm32f4-hal/stm32f4xx_hal.d" -MT"system/src/stm32f4-hal/stm32f4xx_hal.o" -c -o "system/src/stm32f4-hal/stm32f4xx_hal.o" "../system/src/stm32f4-hal/stm32f4xx_hal.c"
c:/stm32toolchain/build tools/bin/sh: arm-none-eabi-gcc: not found
system/src/stm32f4-hal/subdir.mk:36: recipe for target 'system/src/stm32f4-hal/stm32f4xx_hal.o' failed
make: *** [system/src/stm32f4-hal/stm32f4xx_hal.o] Error 127
00:11:01 Build Finished (took 278ms)
thanks
Take a look to the Troubleshooting appendix in my book, at the paragraph "Eclipse cannot locate the compiler".
Hi Carmine,
thanks for the tutorial, It is very usefull, and i have got the complete book.
Howver I have a problem with the ST-LINK utility when i want o program the board
I use the nucleo board STM32L053R8.
I have buils the envrionnment with eclipse following the tutorial ad modiye some parts for the specific board, using stm32 cube
I have update the firmware. with ST-LINKUpgrade
when i program the board with mbed ( drop the binary on the device), it works
When i use the stm32 st-link utility , it detects the board ( flask size and core), but i have always this error
"No elf loader found for this operation"
so whan i want to download the . hex file, it doenst work.
So do you have an idea of the problem, what can be worng ?
Thanks
Thank you Carmine! You've done all of us a great service.
This is all great stuff. Im loving it. But how do I create a blank clean project that doesnt use HAL? I know I can select NONE or BLINKY but when I select NONE it still has all the HAL imports..
Im still a beginner and the HAL stuff is rather confusing. I created my own blinky sample and Im writing my own drivers but HAL is conflicting my project with errors.
Really nice tutorial. Thanks for putting this together!
DEAR CARMINE:
I got a problem in part: "Install the GNU ARM plug-ins for Eclipse"
my eclipse: mars 2
my board: stm32f746zgt nucleo 144
when I click on "add" and fill fields with those stuff you write, I get this:
Unable to connect to repository http://gnuarmeclipse.sourceforge.net/updates/content.xml
Unable to connect to repository http://gnuarmeclipse.sourceforge.net/updates/content.xml
Connection timed out: connect
thank you
my problem program make found in path
my problem program make found in path still cannot solve i just add path
Cannot complete the install because one or more required items could not be found.
Software being installed: GNU ARM C/C++ Cross Compiler 2.4.1.201704251808 (ilg.gnuarmeclipse.managedbuild.cross.feature.group 2.4.1.201704251808)
Missing requirement: GNU ARM C/C++ Core 3.4.1.201704251808 (ilg.gnuarmeclipse.core 3.4.1.201704251808) requires 'bundle org.eclipse.ui.workbench 3.105.0' but it could not be found
Cannot satisfy dependency:
From: GNU ARM C/C++ Cross Compiler 2.4.1.201704251808 (ilg.gnuarmeclipse.managedbuild.cross 2.4.1.201704251808)
To: bundle ilg.gnuarmeclipse.core 0.0.0
Cannot satisfy dependency:
From: GNU ARM C/C++ Cross Compiler 2.4.1.201704251808 (ilg.gnuarmeclipse.managedbuild.cross.feature.group 2.4.1.201704251808)
To: ilg.gnuarmeclipse.managedbuild.cross [2.4.1.201704251808]
Good point to start from!
[…] To do so i need to set up the Eclipse Oxygen 3 IDE for my Windows XP x86 OS as descriped in this guide: https://www.carminenoviello.com/2014/12/28/setting-gcceclipse-toolchain-stm32nucleo-part-1/ […]
[…] GCC ARM 在 WIN7 建立 STM32 開發環境 Build STM32 applications with Eclipse, GCC and STM32Cube Setting up a GCC/Eclipse toolchain for STM32Nucleo Importing a STCubeMX generated […]
[…] aún no ha instalado la cadena de herramientas base, puede comenzar a leer esta publicación y detenerse en el párrafo ” Crear un proyecto de […]
[…] Si necesita instalar un GCC / Toolchain completo, puede seguir esta guía . […]
Hi,
I just purchased your book (very nice by the way) and note in the book you don't mention about setting up a virtual machine. Did your views change on that? I tend to mostly work in Windows and am okay staying there and using c:\\STM32Toolchain as my installation folder.
Regards,
Hi,
jsut wanteed to say that I am very grateful for an etraodinary work and beautiful article.
Nonehteless, i think th enew link to download the Plug-ins for eclipse is
https://download.eclipse.org/embed-cdt/updates/v6/
correct me if i am wrong.
Thank you for everything.
Best regards.